Baby onesie embroidery works when three things are right: the stabilizer, the size of the design, and the finish on the inside of the garment. Get those right and a name, monogram or small motif looks crisp and stays soft against newborn skin. Get them wrong and you get puckering, stitches that sink into the knit, and a scratchy back. This guide covers how to embroider a onesie, what makes it safe, what US sellers must document, and when a digitized file or a small patch is the smarter route.
TL;DR
- Use a cut-away or fusible mesh stabilizer on onesies. Tear-away is not enough for soft, stretchy knit.
- Keep designs small and light, and cover the back of the stitching with a soft fusible backing so it does not rub the baby’s skin.
- Anything that can detach, such as a patch edge or a bead, is a choking risk. Stitch it down securely, and avoid add-ons that could come loose.
- If you sell onesies in the US, they are children’s products: you need a Children’s Product Certificate, a tracking label and care instructions.
- Need a clean, embroidery-ready file? We digitize left chest designs for $10. Need a patch? Ask us for a free quote.
Table of Contents
- Why onesies are harder than they look
- Choose the right stabilizer
- Hooping without hoop burn
- Design size, placement and thread
- Safety: what makes embroidered baby clothes safe
- If you sell onesies: the paperwork
- Perspective: what we see from the patch side
- Embroidery or a patch: which fits your onesie?
- Order-ready files for baby apparel sellers
- Step by step: embroidering a onesie
- Common mistakes to avoid
- FAQ
- Sources
Why onesies are harder than they look
A onesie is small, thin and stretchy. Those three traits cause most problems. Dense stitching pulls the knit, the fabric ripples around the design, and the needle can push soft fibers down into the stitches.
Practitioners describe onesies as inherently challenging because of their small size and stretchy knit. The fix is not a fancier design. It is stabilizing the garment properly before you stitch a single thread.
There is also a comfort factor that adult apparel does not have. A baby’s skin is sensitive, and the underside of an embroidery design is where friction happens. Every decision below comes back to these two points: keep the fabric stable, and keep the inside soft.
Choose the right stabilizer
Stabilizer is the single biggest quality lever. OESD’s knowledge base notes that for stretchy fabrics, the stabilizer has to match the stretch of the material. In practice, that means:
| Stabilizer | Works on onesies? | Notes |
|---|---|---|
| Tear-away | Poor choice | Offers little long-term support for soft knit, so the design can distort after washing |
| Cut-away | Yes | The standard for knits. Keeps the design stable through repeated laundering |
| Fusible no-show mesh | Yes, often preferred | Thin, light, and adds little bulk. Iron it on before hooping |
| Water-soluble topping | Yes, on top | Keeps stitches from sinking into the fabric |
A fusible no-show mesh is often chosen over spray adhesive for precision, and a water-soluble topping on the front helps delicate designs stand up from the knit. The goal is support without stiffness. A onesie with a thick, boardy patch of stabilizer behind a name is not a comfortable garment.
Cover the back for comfort
Cut-away leaves a hard edge and stitch ends against the skin. The usual professional fix is a soft, fusible iron-on backing placed over the finished design on the wrong side. Sulky describes its soft fusible product as one you most often see on baby clothes, covering the stitches on the wrong side.
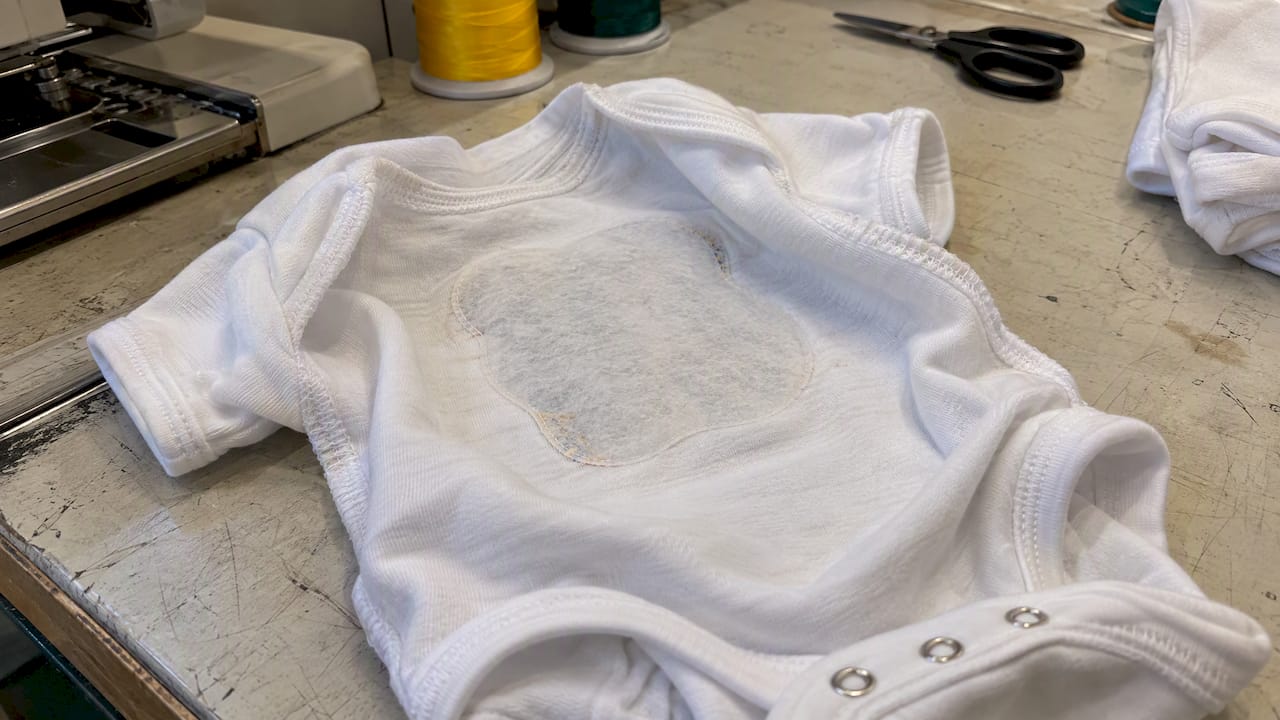
Do not skip this step. It is the difference between a keepsake and a onesie a parent stops dressing the baby in after one wear.
Hooping without hoop burn
A onesie squeezed into a small hoop gets stretched and marked. Two approaches work:
- Float the garment. Hoop a piece of stabilizer, then attach the onesie on top with spray adhesive or iron-on tape. This avoids hoop burn and fabric stretching.
- Hoop the garment directly. Fold the excess onesie fabric away neatly and clip it back. Check that the clips cannot catch in the machine’s moving parts.
Either way, run a test on a scrap of similar knit first. Check the tension, look for puckering, and confirm the design reads clearly at its real size before you touch the finished garment.
The snaps between the legs and the neckline’s stretchy envelope shoulders also matter. Keep the design well away from seams, snaps and the neckline so the needle does not hit hardware and the garment can still stretch where it needs to.
Design size, placement and thread
Small garments need small designs. A left chest placement works well for a short name, initials, a tiny animal or a simple logo. Large, dense fills are the usual culprit behind stiff, puckered results.
Some rules of thumb that hold up:
- Keep stitch counts low. Fewer, lighter stitches mean less pull on the knit and a softer feel.
- Avoid tiny text. Letters that are too small blur or fill in. Our guide to making small text readable on patches explains the minimum heights that stitch cleanly, and the same logic applies to onesie lettering.
- Size monograms for the hoop and the garment. See our note on safe monogram sizing for onesies in a 4×4 inch hoop.
- Choose open designs. Outlines and light fills drape better than solid blocks.
The design file matters as much as the machine. A file digitized for a jacket back will not behave on a six-month onesie. Underlay, density and pull compensation all need to be set for a stretchy small garment. That is why many boutiques and online sellers order a dedicated file for infant wear rather than reuse an adult one.
Safety: what makes embroidered baby clothes safe
Is it safe to embroider baby clothes? Yes, when the design is done carefully. Plain embroidery is thread stitched into the fabric. The risks come from what can come loose and what touches the skin.
Keep things from detaching
Children’s clothing is exempt from the small parts ban at 16 C.F.R. § 1501.3, but the CPSC still tells businesses that decorative elements such as buttons or patches must be securely attached, because they can detach and become a choking hazard. The agency also points to use and abuse testing and cautions against decorative components that could come off under it.
There is a real recall example. A pair of embroidered girls’ shorts was recalled because decorative studs could detach and pose a choking risk. The lesson for onesies: skip beads, studs, sequins and anything with a shank. Choose flat stitching.
Lead limits on decorative parts
The CPSC states that decorative components on products for children under 12 must not exceed 100 ppm total lead, with surface coatings limited to 0.009 percent. If you add a patch or any trim from a supplier, ask for material documentation. Our guide to safe baby patch materials and the 100 ppm lead limit walks apparel shops through what to request.
Sleepwear and fit
Infant garments sized nine months or smaller fall under their own definition in the CPSC’s infant garment rules for tight-fitting sleepwear. If you embroider sleepwear, check those requirements for your product before you design around them.
This section is general guidance for makers. If you sell onesies commercially and are unsure which rules apply to a specific garment, ask a CPSC-accepted testing laboratory or a product compliance professional.
If you sell onesies: the paperwork
Personalized onesies for sale are children’s products, and that triggers documentation that hobby gifting does not. Three items come up most for small sellers.
- Children’s Product Certificate (CPC). It is not filed with the CPSC. It is a document you keep and can produce, confirming the product was tested to the federal rules. The CPSC lists a missing certificate among the common e-commerce safety violations.
- Tracking label. Children’s apparel for ages 12 and under needs a permanent label showing the manufacturer, production location and date, and batch information under Section 103 of the CPSIA. The CPSC’s guide to apparel and household textiles covers the requirement.
- Care label. The FTC’s Care Labeling Rule requires clear, permanent washing instructions, and you need a reasonable basis for them. The FTC’s care labeling guidance for clothing explains what to include.
Who is responsible for what depends on whether you made the blank onesie, imported it, or only decorated it. Confirm your role with a compliance professional before you launch a line.
Our practical tip: write the care instructions for the embroidery as well as the garment. If a design cannot take hot water or a hot dryer, say so, and test it.
Perspective: what we see from the patch side
We make custom patches and digitize embroidery files, and baby apparel sellers come to us with the same three worries: will it be soft, will it hold, and will it survive a hundred washes?
Our view is simple. For names and monograms stitched straight onto a onesie, a well-digitized file does most of the work. The file decides how the stitches lay, how dense they are and how the design behaves on knit. That is why we treat digitizing as its own craft rather than a button you press.
Patches have a place, but they need more thought on infant wear. A patch adds an edge, a backing and bulk. On a baby garment, we steer customers toward embroidered or woven patches with flat, fully stitched borders, and we tell them to attach every patch with a firm sew-on method rather than rely on adhesive alone. Our article on patching baby clothes with a safe iron-on method explains the parent-friendly version, and our guide to which patch survives your fabric compares the two constructions.
We also push every apparel shop to order a sample first. Free samples exist for that reason: you feel the back, wash it, tug the edge, and only then commit to a bulk run.
— Bilal
Embroidery or a patch: which fits your onesie?
| Situation | Better choice | Why |
|---|---|---|
| Name, initials, birth date | Direct embroidery | Lightest feel, most flexible on knit |
| One logo across a whole product line | Direct embroidery with a dedicated digitized file | Consistent results across sizes |
| Same design on many garment types, including heavier fabrics | Patch | Make once, apply to blankets, bibs and jackets |
| Add-on for a photo shoot outfit | Either | Our newborn photo embroidery guide covers keepsakes and props |
| Fraying risk on a small edge | Merrowed or embroidered border | Finished edges resist fraying |
If you go with patches, backing is the next choice. Sew-on is the most secure for infant wear. Iron-on is convenient but depends on heat and fabric. Our breakdown of patch backing types shows how each holds up. If edges are a worry, see our fixes for fraying patch edges.
Order-ready files for baby apparel sellers
Boutiques, Etsy and Shopify sellers, photography studios, hospital gift shops and daycare suppliers share a problem: the same design has to look identical on every garment. A clean digitized file solves that.
We digitize designs for embroidery. The published prices are $10 for a left chest design and $10 for a cap design, with jacket back designs from $30. On a onesie, left chest is the placement you will use most. See our embroidery digitizing service to send your artwork.
If you are comparing options, our pages on digitizing cost and stitch count math and on turning a logo into an embroidery file explain what drives price and what to ask for, including a sew-out to check the result.
Need patches for a bigger run, such as welcome kits, school logos for toddlers or a branded line? Custom patches start from $99. We offer embroidered patches, woven patches and other constructions, with free shipping, free samples and a fast quote. Get a free quote and tell us the garment, the size and the quantity.

Step by step: embroidering a onesie
If you are stitching yourself, this is the order that works:
- Prewash. Wash and dry the onesie first so it does not shrink around the design later.
- Choose the stabilizer. Iron on a fusible no-show mesh or use cut-away. Skip tear-away.
- Mark placement. Fold the onesie to find the center and align it with a crease on the stabilizer. Keep the design away from snaps and seams.
- Hoop or float. Float on hooped stabilizer to avoid hoop burn, or hoop carefully and clip the excess away.
- Add topping. Lay water-soluble topping over the area for fine detail.
- Test. Run the file on a scrap of the same knit.
- Stitch. Use a fresh, appropriate needle and keep the speed moderate.
- Finish. Trim jump threads, remove the topping, trim the stabilizer close, and cover the back with a soft fusible backing.
- Check the wash. Wash one sample at the care temperature you plan to put on the label.
One caution on handling: when you are working with a machine, keep your fingers clear of moving parts and inspect the cord and ventilation before you start. University extension guidance on sewing machine safety covers the basics.
Common mistakes to avoid
- Using tear-away on knit. The design distorts after a few washes.
- Too much density. A heavy fill on a small onesie feels stiff and puckers.
- Skipping the soft backing. The back rubs against the baby’s skin.
- Adding beads or studs. They can detach, and that is exactly the failure the CPSC warns about.
- Reusing an adult file. Size, density and underlay need to be set for infant wear.
- Ignoring the label. A beautiful onesie without a care label and tracking label is not ready to sell.
FAQ
How do I embroider a baby onesie?
Prewash the onesie, stabilize it with cut-away or fusible no-show mesh, and either float it on hooped stabilizer or hoop it carefully. Test the design on a scrap of similar knit. After stitching, cover the back with a soft fusible backing so it does not irritate the skin.
Is it safe to embroider baby clothes?
Flat embroidery with thread is generally a safe decoration when it is stitched securely and finished softly on the inside. The risk comes from parts that can detach, such as beads, studs or poorly attached patches, which the CPSC treats as a choking concern. If you sell the garment, check the federal children’s product requirements.
How do I personalize a baby onesie?
The simplest way is a small name, initials or motif on the left chest, stitched from a digitized file sized for infant wear. You can also attach a securely sewn embroidered or woven patch. Test one sample through the wash before you make a batch.
Where can I find custom embroidered onesies in bulk?
If you run a boutique, gift company or online shop, you can supply blank onesies and order a digitized file, or order patches to apply to your own garments. We can quote patches quickly and send free samples, so you can judge the feel before you order.
Sources
- Embroidering on Onesies
- How To Embroider A Onesie
- The Stabilizer Basics: Cut Away and Tear Away Stabilizers
- First Aid for Embroidery, OESD Knowledge Base
- Small Parts Ban and Choking Hazard Labeling, CPSC
- Small Parts and Choking Hazard Labeling FAQs, CPSC
- Pink Angel Embroidered Girls’ Denim Shorts Recall, CPSC
- Infant Garments and Tight-fitting Sleepwear Garments, CPSC
- Common E-commerce Safety Violations, CPSC
- Guide to US Apparel and Household Textiles, CPSC
- Clothes Captioning: Complying with the Care Labeling Rule, FTC
- Sewing Machine Safety, UC Agriculture and Natural Resources