A woven patch holds more detail than an embroidered one. The design is woven from fine threads into a flat, smooth piece of fabric, so small lettering, thin outlines and intricate logos stay crisp. Detail still has limits, though. Text size, line weight, color count and border choice all decide whether your artwork comes out sharp or soft. This guide shows you where those limits sit and how to prepare art that works the first time.
TL;DR
- Woven patches use finer threads than embroidery and lie flat, so they suit small text, thin lines and complex logos.
- Detail is not unlimited: keep text and linework above a minimum size, and simplify gradients into clean color steps.
- The border and backing change the look and feel, so pick them with the garment in mind.
- Bold, simple designs with thick outlines often look better embroidered, so match the format to the art.
- We offer woven patches with free samples and fast quotes, so you can check the detail before you commit to a bulk run.
Table of Contents
- What a woven patch is, and why it holds more detail
- How much detail can you actually get?
- Woven vs embroidered: choosing by detail level
- Borders and backings change the detail you see
- How to prepare artwork for a detailed woven patch
- Our view: where detail wins and where it backfires
- Where woven patches shine
- Attaching and caring for a woven patch
- Order a woven patch from Lee Embroidery
- FAQ
- Sources
What a woven patch is, and why it holds more detail
An embroidered patch is stitched. Thick thread is laid down on a twill base, which gives it a raised, textured feel. A woven patch is built differently. Fine threads are interlaced to form the design itself, so the artwork is part of the fabric rather than something sitting on top of it.
Two things follow from that.
- Thinner threads mean finer resolution. Each thread is a tiny pixel of color. The thinner the thread, the more of them fit in a given space, and the smaller the element you can draw.
- The surface is flat. Nothing is piled up, so edges look cleaner and the patch sits low on the garment. That matters on baby apparel, thin tees, polo shirts and dress shirts where a bulky badge feels wrong.
If you want the full picture of the product, our woven patches page shows the options. If you are still choosing between formats, our guide on woven vs embroidered patches for apparel goes deeper on fabric behavior.
How much detail can you actually get?
There is no single magic number, because it depends on the artwork, the patch size and the thread colors. But the same few elements cause nearly every detail problem. Check them in this order.
Small text
Lettering is where woven patches earn their keep. A logo with a tagline, a brand name with a registered mark, or a crest with a motto can all be woven at sizes where embroidery would clog up. Serif fonts, thin strokes and condensed typefaces survive better in woven form.
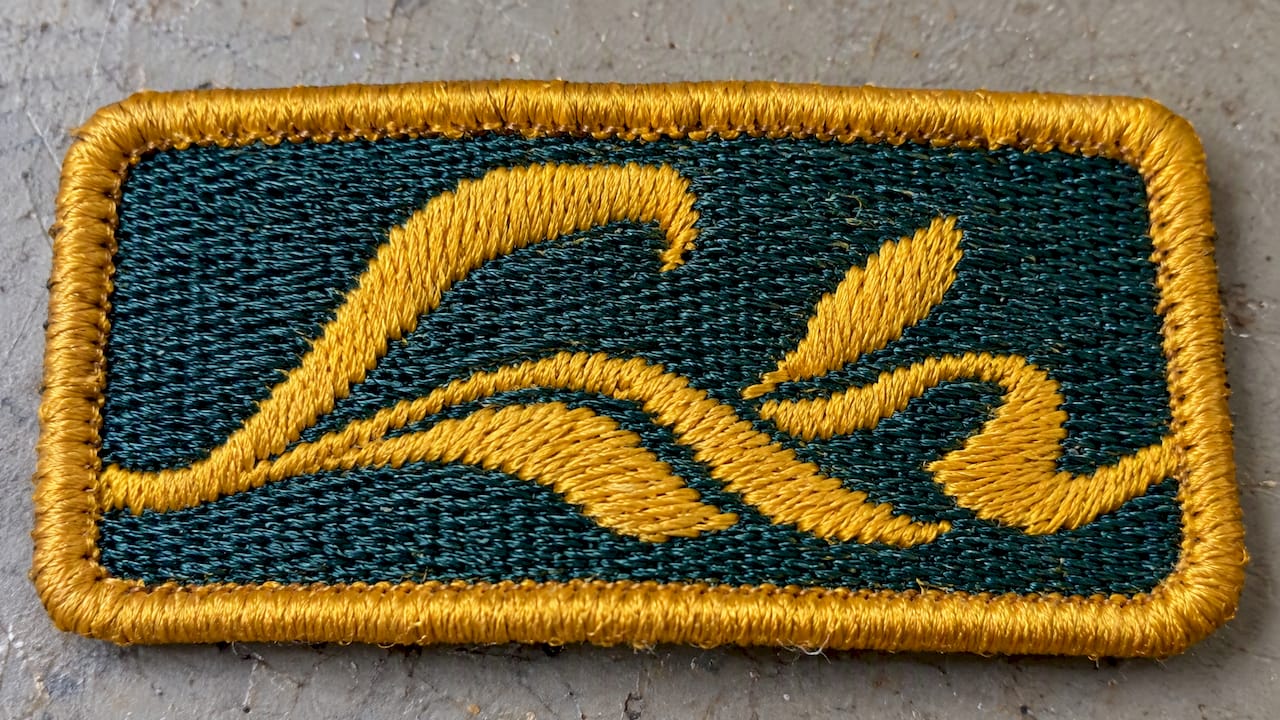
We publish order-ready specs for tiny lettering in our guide to making small text readable at 5 to 6 mm. Use it as your working benchmark, and send us the artwork if you want a second opinion on a specific line of type.
A few rules hold in any shop:
- Choose a sans serif or a sturdy serif over script and hairline fonts.
- Keep strong contrast between letter and background, such as white on navy or black on gold.
- Avoid reversed text in a thin weight on a busy background.
- If one word is tiny and everything else is large, enlarge the tiny word or drop it.
Thin lines and outlines
Fine lines carry a logo’s character: the hairline in a monogram, the border inside a shield, the spokes of a wheel. A woven patch reproduces them well, but a line that is too thin vanishes when it sits beside a darker color. When you design, give outlines a clear, consistent weight and leave breathing room between neighboring lines, so two colors don’t blur into one.
Color and gradients
Woven patches are built from a limited palette of thread colors, so a photographic gradient does not translate. What works is clean color steps: a sky that moves from dark blue to light blue in three or four bands, for example. Make it easy on the weaver by flattening the artwork into solid color areas before you send it. If you need a true photographic look, a printed patch is the better format.
Small shapes and tight gaps
Tiny dots, narrow gaps and sharp inner corners soften in any thread-based product. If a gap between two shapes is barely visible on your screen at actual size, it will probably close up. Widen it slightly, or merge the shapes.
Woven vs embroidered: choosing by detail level
Detail is not always the goal. A bold mascot on a varsity jacket wants texture and weight, and embroidery gives it that. A fine-lined crest on a polo wants a flat, refined finish, and weaving gives it that. The table sums up how we think about the choice.
| Factor | Woven patch | Embroidered patch |
|---|---|---|
| Surface | Flat, smooth | Raised, textured |
| Fine text | Strong | Needs larger lettering |
| Thin lines | Strong | Needs thicker lines |
| Bold, simple logos | Good | Excellent |
| Gradients | Limited to color steps | Limited to color steps |
| Feel on thin fabric | Low profile | Heavier |
| Typical use | Labels, hats, crests, polos, baby apparel | Jackets, uniforms, caps, bags |
For jackets, caps and bags where you want a rugged, tactile look, see our embroidered patches. For a hat-specific comparison, read hat patches vs embroidery. If your team wants an even chunkier, letterman style, there is also a breakdown of chenille vs embroidered patches.
Borders and backings change the detail you see
A patch is more than its face. The edge and the back decide how it looks on the garment and how it holds up.
Border options
We offer merrowed, embroidered and laser-cut borders. Here is how each affects a detailed woven design:
- Merrowed border. The classic rolled edge. It frames the patch and protects the edge from fraying, but it takes up a little space around the artwork, so keep fine detail away from the outer rim.
- Embroidered border. A flatter, cleaner edge that suits a modern look.
- Laser cut. A precise, flush edge that follows complex shapes. It works well when the silhouette itself is part of the design. Fraying on cut edges is the thing to watch, and our guide to fixing fraying patch edges covers finishes that prevent it.
Backing options
Our backings are sew-on, iron-on, peel-and-stick and Velcro. The thin, flat build of a woven patch suits most of them, but the garment decides the right one.
- Sew-on is the most permanent and the best choice for anything that gets washed often.
- Iron-on is quick, but it relies on adhesive and heat, so check the fabric first.
- Peel-and-stick is for temporary or display use.
- Velcro lets you swap patches on uniforms and gear. See Velcro patch strength for the figures.
If you are weighing sew-on against iron-on for work gear or uniforms, this piece on sew-on, iron-on and hybrid patches walks through how each holds up over time.
How to prepare artwork for a detailed woven patch
Good input saves a revision round. Follow these steps before you request a quote.
- Start with a vector file if you have one (AI, EPS, SVG or a clean PDF). A high-resolution PNG also works. A small, blurry screenshot does not.
- Decide the actual size. Detail is relative to patch size. A logo that is crisp at 3 inches can fall apart at 1.5 inches.
- Simplify the colors. Flatten gradients and shadows into a few solid areas.
- Check the smallest elements. Print the artwork at actual size on paper. If you can’t read the smallest text from arm’s length, tell us, and we will suggest changes.
- Mark your must-keep details. If a tiny trademark symbol can be dropped but the tagline cannot, say so.
- Choose border and backing based on the garment and how often it will be washed.
- Request a sample. Seeing the thread in your hand beats any screen preview.
If the same artwork also needs to go on shirts or caps, high-resolution files matter there too. This short guide on preparing logo files for apparel explains resolution in plain terms.
Our view: where detail wins and where it backfires
Here is what we see when brands come to us with artwork.
Most detail problems are not manufacturing problems. They are sizing problems. A designer draws a beautiful logo on a large screen, then the logo gets shrunk to the size of a matchbook. Weaving gives you more room than stitching, but it does not repeal the laws of scale. We would rather tell you up front that a line needs to be bigger than have you receive 500 patches with a smudge where the tagline should be.
We also see the opposite mistake. People hear that woven means detailed and choose it for artwork that is bold and simple. A thick-lined mascot on a work jacket often looks better with the depth that embroidery gives. Detail is a tool, not a trophy.
Our rule of thumb is to look at the smallest thing in your design and ask whether it matters. If yes, weave it and size it properly. If no, simplify it and let the strong shapes carry the patch.
That is why we offer free samples and quick quotes. You see what your artwork becomes before you spend on a full run, and we can flag trouble spots early. We want your patch to look like a piece of art, built to last, with vibrant colors that hold.
— Bilal
Where woven patches shine
Because they are thin, flat and precise, woven patches fit certain jobs better than others.
- Clothing labels and brand tags. A small, flat patch with a logo and fine text suits a collar or hem.
- Baby and children’s apparel. Boutiques, online sellers of personalized onesies, and newborn gift companies like a patch that sits low and soft against a small body. Whatever the garment, follow the maker’s care and safety guidance for infant wear.
- Hats. A smooth patch on a cap front keeps detail without adding bulk. Our hat patches guide covers when to choose each method.
- Crests, school and club badges. Mottos, dates and shield detail come out clean.
- Lightweight garments. Polos, dress shirts and performance wear don’t pucker under a thin patch as readily.
- Small-batch brands. If you are weighing patches against printing at low volumes, this look at embroidered vs printed choices for small brands can help frame the decision.
Attaching and caring for a woven patch
A detailed patch deserves a careful attachment. Sewing remains the most durable method, especially for items that will be washed.
When you sew a patch on, iFixit’s patching guide advises matching your thread color closely to the border and stitching close to the edge. It also recommends against relying on adhesive alone for items that get washed or heavily handled. Pin the patch in place first and keep your stitches even.
For uniform programs, match the backing to the garment and the wash routine. Our guide to washing patches for uniforms explains the match.
Order a woven patch from Lee Embroidery
We make woven, embroidered, chenille, PVC, leather and printed patches, with full control over shape, border and backing. Custom patches start from $99. We turn quotes around quickly, ship free, and send complimentary samples, so you can judge the detail yourself.
If your artwork also needs to go on garments, our embroidery digitizing service converts designs into embroidery-ready files: left chest and cap designs are $10 each, and jacket back designs start from $30.
Ready to see your logo in thread? Request a free quote and send us your artwork. You can also read what other buyers say on our customer reviews page, or browse our full guide to custom patches.
FAQ
What is a woven patch?
A woven patch is a flat patch made by weaving fine threads together so the threads form the design. Unlike an embroidered patch, the artwork is not stitched on top of a twill base. The result is smoother and thinner, with sharper small text and lines.
Are woven patches more detailed than embroidered patches?
Yes, in general. Finer threads let a weaver reproduce smaller lettering and thinner lines than thick embroidery thread can. Bold, simple artwork can still look better embroidered, because that format adds texture and depth.
What should I look for in a woven patch company?
Look for clear guidance on minimum text and line sizes, border and backing choices, and a free sample before bulk production. Check that they review your artwork and warn you about weak spots. Reviews from buyers with similar orders, such as apparel brands or teams, are also a good sign.
How do I attach a woven patch to clothing?
Sewing is the most durable method, and it is best for anything you will wash often. Iron-on and peel-and-stick backings are quicker but rely on adhesive. Velcro suits uniforms where patches need to be swapped.