For baby clothes, the best patch backing is usually a heat-seal (iron-on) layer reinforced with a stitched border, or a plain sew-on patch with no adhesive at all. Both keep the patch flat on thin, stretchy knits. The back of the patch also has to stay soft against skin, and the attachment has to be secure enough that nothing detaches. Thick, plastic-backed patches and peel-and-stick adhesives are the wrong tools for a onesie.
This guide covers two things people mean when they search this phrase: the backing on a finished patch, and the stabilizer or cover layer used behind embroidery on baby garments. You will see what each option does, where it fails on infant apparel, and how to order patches that suit the garment.
TL;DR
- Best all-round choice: heat-seal (iron-on) backing plus a stitched perimeter, or sew-on with no backing, on soft cotton knits.
- Skip on infant wear: thick plastic-stiffened patches, peel-and-stick, and anything bulky or hard on the inside.
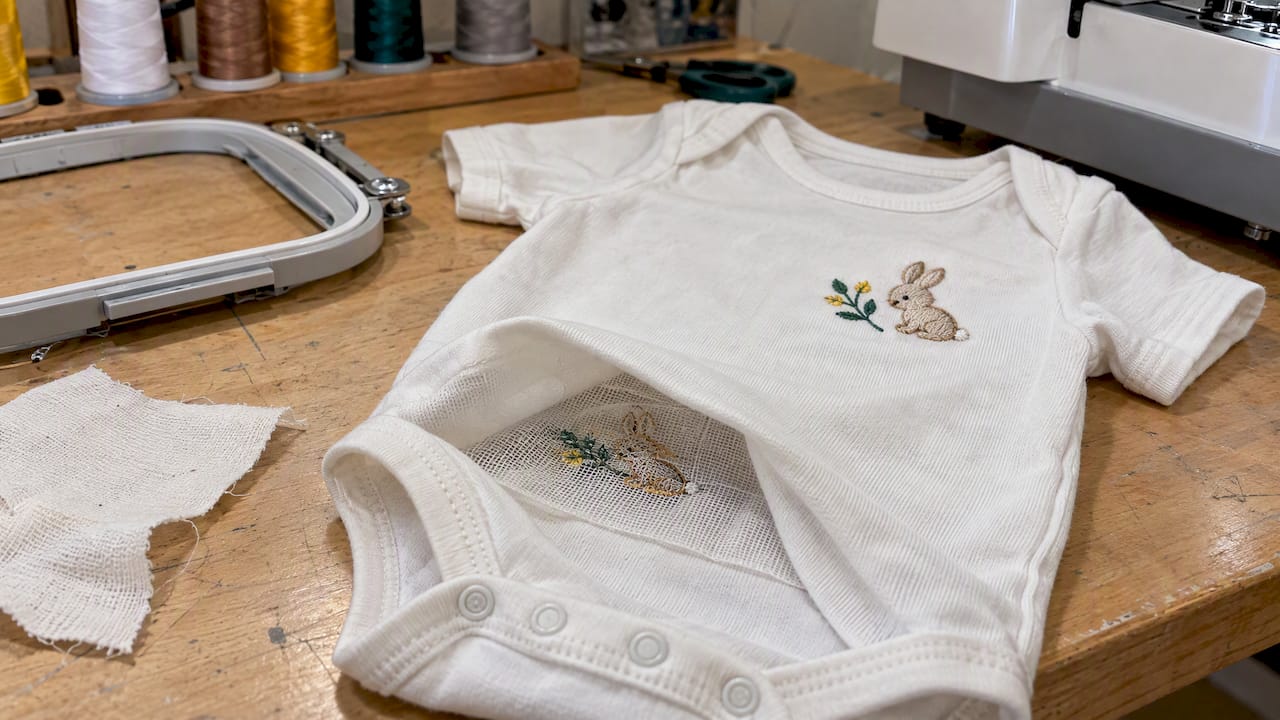
- Embroidering directly on a garment: use a soft cut-away or no-show mesh backing that stays in the garment, then cover the back of the stitching.
- Safety first: an attachment that can come loose is a choking risk, so stitch around the edge and check it after every wash.
- Not sure? Request free samples and wash-test them before you commit to a bulk order.
Table of Contents
- What is the backing of a patch called?
- Patch backing options, judged for baby clothes
- Choosing the patch type before the backing
- Backing for embroidery done directly on baby garments
- Make the back of embroidery comfortable against skin
- Safety: an attachment that fails is a choking hazard
- Attaching and caring for a patch on a onesie
- Our perspective
- Order patches built for baby clothes
- FAQ
- Sources
What is the backing of a patch called?
The layer on the back of a patch is simply called the patch backing. Some backings are named for how they attach (sew-on, iron-on, adhesive, hook and loop), and some for the material (plastic, heat-seal film, magnetic, pin). Industry guides list the standard set as no backing, plastic backing, heatseal (iron-on) backing, adhesive (peel-and-stick) backing, hook and loop backing, magnetic backing and pin backing.
The word “backing” has a second meaning in embroidery. There it refers to a stabilizer, a layer under the fabric that supports the stitching while it is sewn. MELCO’s help center uses the terms together. If you are embroidering directly onto a garment, that is the backing you need. If you are buying finished patches, you need the first kind. Most baby clothing sellers end up needing both, so we cover both below.
Patch backing options, judged for baby clothes
Baby garments are small, thin and stretchy. Whatever you attach has to flex with the fabric, feel soft inside and survive frequent hot-water washing by parents. Here is how each backing performs under those conditions.
| Backing | How it attaches | Fit for baby clothes | Main concern |
|---|---|---|---|
| No backing (sew-on) | Stitched around the edge | Excellent | Needs a few minutes of hand or machine sewing |
| Heat-seal (iron-on) | Heat and pressure, ideally plus stitching | Very good on cotton knits | Heat must stay within the care label limit |
| Plastic backing | Sewn on, stiffened by the plastic layer | Poor on onesies | Adds stiffness that fights stretchy fabric |
| Adhesive (peel-and-stick) | Temporary adhesive | Not for permanent use | Not designed to survive repeated washing |
| Hook and loop | Hook side on patch, loop side on garment | Rarely suitable | Hard surface against skin, extra parts |
| Magnetic or pin | Magnet or pin | Not appropriate | Hard parts and sharp points near infants |
Our own range covers sew-on, iron-on, peel-and-stick and Velcro backings across every patch type we make. For a baby line, the first two are the ones we steer people toward. Our page on patch backing types goes into how each one bonds and how adding stitching changes durability.
Sew-on: the safest default
A sew-on patch with no adhesive layer stays thin and flexible. The patch moves with the fabric instead of resisting it. The attachment is thread, so there is nothing to peel or delaminate, and you can see at a glance whether the stitching is intact.
The tradeoff is labor. If you run a boutique and finish a few dozen pieces a week, stitching around each patch is realistic. If you sell thousands, it is a cost you need to price in. Our guide to testing iron-on versus sew-on patches with free samples shows how to compare both on your own garments.
Heat-seal (iron-on): fast, but pair it with stitching
Iron-on backing is a heat-activated adhesive film. It is the quickest route for parents and for production, and it is the reason most people searching this topic land on iron-on patches. On thin cotton knits it can give a clean, flat result.
Two habits make it dependable. First, treat the garment’s care label as the upper limit for heat, and keep the press short. We lay out the steps in our iron-on patch instructions, and our page on verified iron-on temperatures by fabric helps when a label is unclear. Second, once the patch has cooled, stitch around the perimeter. The adhesive does the positioning; the thread does the holding. For a parent-friendly walk-through, see our guide on patching baby clothes with a quick iron-on method.
If you press patches in volume, run settings on scrap first. Our notes on heat press settings for patches explain why.
Plastic backing: better on a jacket than a onesie
Plastic backing adds stiffness and support so a patch stays flat over time while remaining thin enough to sew. That is a real benefit on a twill jacket or a cap. On a onesie, the same stiffness works against a fabric that stretches. Owners on sewing forums describe the same problem: heavier patches with a plastic-feeling back suit woven fabric, not stretchy onesies. If your design needs to go on a baby item, ask for a lighter build with a soft or minimal back.
Peel-and-stick, hook and loop, magnets and pins
Peel-and-stick is useful for temporary displays and for items that are not worn or washed. A baby garment is the opposite case. Hook and loop works well on diaper bags and backpacks, where a patch needs to be swapped out, but a hard hook surface does not belong against an infant’s skin. Magnets and pins have no place on infant clothing. If your customer base includes accessories, a hook-backed patch on a diaper bag is a sensible use, and we make those too.
Choosing the patch type before the backing
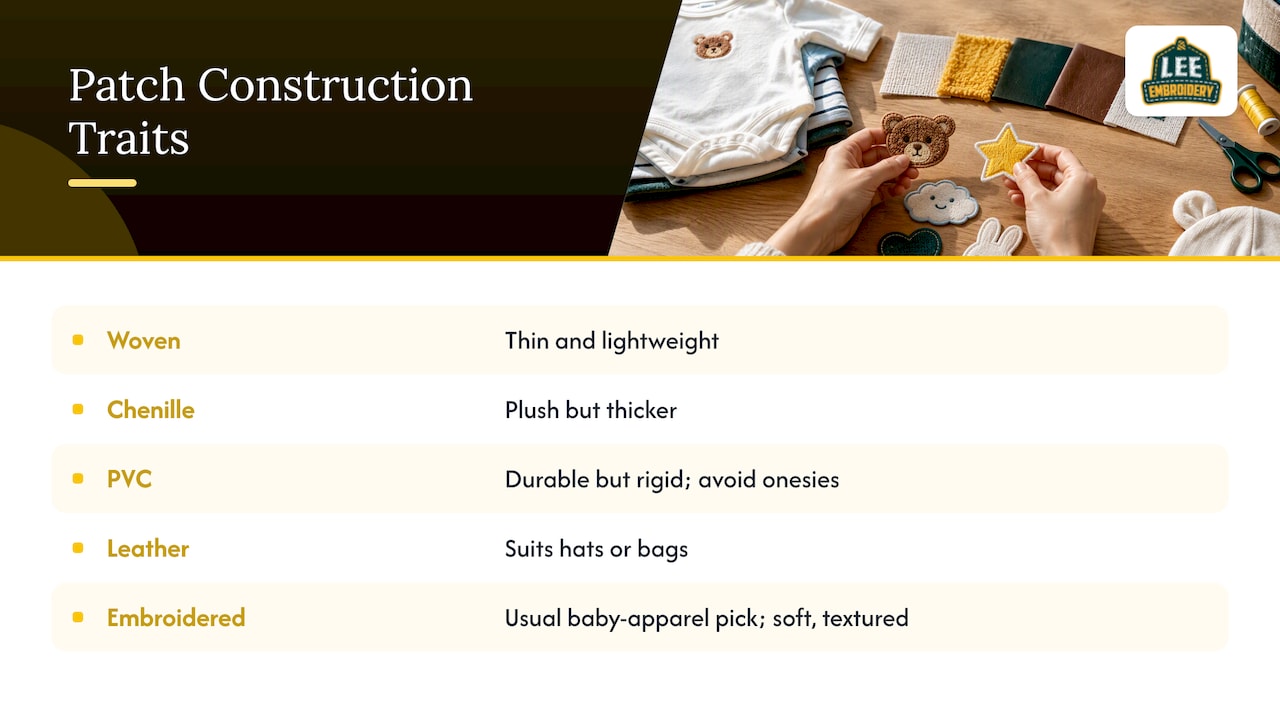
Backing works together with the patch itself. A woven patch with fine thread is thin and lightweight. A chenille patch is plush but thicker. PVC is durable but rigid, so we would not put it on a onesie. Leather suits accessories such as hats or bags. Embroidered patches sit in the middle and are the usual pick for baby apparel because the stitching gives a soft, textured look.
If you are deciding between constructions, our comparison of woven versus embroidered patches for apparel shows which survives which fabric, and printed versus woven patches helps when your artwork has gradients or small detail.
Before settling on materials for a children’s line, read our note on safe baby patch materials and the 100 ppm lead limit. It is written for apparel shops and explains what to ask any manufacturer for.
If you are still weighing methods more broadly, this comparison of embroidery, flocking, screen printing and DTF is a handy way to see which decoration technique fits which garment before you pick materials.
Backing for embroidery done directly on baby garments
Some sellers skip patches and embroider the name, date or logo straight onto the garment. Here “backing” means stabilizer, and baby knits need more careful choices than T-shirts.
Use a permanent, soft backing
Cut-away stabilizer is a good choice for knits because it supports the embroidery and prevents the fabric from stretching during stitching, according to MELCO’s stabilizer overview. The rule of thumb that runs through most embroidery guidance is that stretchy fabric needs support that stays in the garment, while tear-away is for stable woven fabric. Tear-away dissolves its usefulness after the first wash on a knit.
For infant wear, the stabilizer also has to be gentle. A soft mesh cut-away is a common pick. Northeastern University’s backing guide describes a soft mesh cut-away suited to infant and children’s wear, and it is the kind of no-show option that avoids bulk and shadowing under the stitches.
Handle dense designs with care
The thinner and stretchier the garment, the less density it can take. A heavily filled logo on a lightweight onesie can pucker or pull. Reduce stitch density where you can, keep designs small and simple, and test on an identical garment before running the batch. MELCO itself notes that embroiderers choose different backing formulas for the same job and that experimentation is part of the craft, so build a test piece into every new product.
Hooping a tiny garment is its own challenge. Gather the extra fabric behind the hoop and keep it out of the machine’s path, or float the garment by hooping only the stabilizer. If you run a small studio and want a plain-language look at which decoration technique suits which garment, this overview of choosing an embroidery technique for apparel is worth a read.
Digitizing makes the backing work
Backing choice and file preparation go together. A file digitized for a stable cap behaves differently on a onesie. If you are producing a name or logo for several garment types, we offer embroidery digitizing at published prices: left chest and cap files are $10 each, and jacket back files start at $30. Wholesale and family-owned baby brands often digitize once, then reuse the file across a whole product line for consistency.
Make the back of embroidery comfortable against skin
A baby’s skin meets the inside of the garment all day. The back of any embroidery or sewn patch has thread ends, knots and stitch ridges. Here is what works.
- Cover the back with a soft fusible layer. Professional guidance describes ironing a soft fusible cover backing over finished embroidery so rough stitches and thread ends do not rub, as DAX Show explains.
- Use backing finishers. The E-ZEE guide mentions heat-applied cover-up layers for babywear that create a soft barrier over the back of finished embroidery.
- Trim carefully. Clip thread tails close, and avoid leaving loose jump stitches inside.
- Choose gentle garments. Soft organic cotton is a sensible base for items worn against newborn skin.
If a patch is sewn on by hand, finish the knots on the outer edge or under the patch instead of against the body side, then add a soft interfacing cover where the stitching shows inside.
Safety: an attachment that fails is a choking hazard
This is the one place we ask you to slow down. The U.S. Consumer Product Safety Commission announced a recall of infant coveralls because the bunny applique could detach, creating a choking hazard for young children. The lesson for any seller is simple: a decoration on baby clothing must stay on.
In practice that means:
- Stitch around the full perimeter of every patch, even when it has iron-on backing.
- Keep patches flat and small enough that they do not create edges a child can pull at.
- Pull-test finished samples and wash-test them repeatedly before selling.
- Tell buyers to check the patch edges after each wash.
- Avoid add-ons with hard parts, such as pins, magnets or loose beads.
If you sell newborn photo sets, the same logic applies to props and keepsakes. We cover it in newborn photo embroidery safety.
Attaching and caring for a patch on a onesie
Our practical routine for a heat-seal patch on a baby knit:
- Check the care label and stay at or below its heat limit.
- Place the patch on a flat, protected surface, with a thin cloth over the top.
- Press for a short, controlled time. Our guides use 15 to 30 seconds as the working range, adjusted to the fabric.
- Let the patch cool fully before moving the garment.
- Stitch around the perimeter.
- Add a soft cover on the inside if the back of the patch or stitching feels rough.
For washing, turn the garment inside out, use cold water on a gentle cycle, and air dry or tumble dry on low. Our patch washing instructions explain why matching backing to the garment cuts down on reprints.
Our perspective
We make patches for a wide mix of customers, and baby brands are the most demanding group for a simple reason: nothing is allowed to go wrong. Our view is that the backing question should be answered by the garment, not by habit. Thin knit means a thin patch, a soft back and stitched edges. If a design needs a heavy build, it belongs on a bag, a hat or a jacket instead.
That is why we send free samples. We would rather you wash a sample ten times on your own onesie than trust a spec sheet. If the edges lift or the back feels stiff, you change the backing before an order of 500 is made, not after. For infants, we lean toward embroidered or woven patches with a sew-on or iron-on-plus-stitch finish, and we keep hard attachments off the table.
— Bilal
Order patches built for baby clothes
If you run a boutique, an online shop, a photo studio or a gift company, we can make custom patches from $99 in the shape, border and backing you choose, with sew-on and iron-on options and free samples so you can test them first. Start with embroidered patches for the softest, most flexible look on infant apparel, then request a quote. Quotes come back fast, and shipping is free.
FAQ
What backing should I use on a patch for a baby onesie?
Choose heat-seal (iron-on) backing plus stitching around the edge, or a sew-on patch with no backing. Both stay thin and flexible on stretchy cotton. Avoid stiff plastic backing and hard attachments.
What is the plastic backing on patches?
It is a layer added to the back that stiffens the patch so it stays flat over time while still being thin enough to sew. That helps on jackets and caps, but it can feel too stiff on a stretchy baby garment.
What should I put on the back of embroidery for baby clothes?
A soft cover layer. Iron a soft fusible knit or interfacing over the finished design so thread ends and stitches do not rub against skin. Behind the stitching during embroidery, use a soft cut-away or no-show mesh that stays in the garment.
Is iron-on backing enough for baby clothes?
We do not recommend relying on adhesive alone. Stitch around the whole patch once it has cooled, because a detached decoration can become a choking hazard. Check the edges after every wash.
Can I use tear-away stabilizer on baby knits?
Generally not. Tear-away gives only temporary support, and stretchy knits need permanent support, so a soft cut-away or mesh is the usual choice.
Sources
- MELCO Help Center: Stabilizer / Backing Overview
- E-ZEE Backing Guide (Northeastern University Makerspaces)
- DAX Show: Embroidery on Baby Clothes
- CPSC: Weeplay Kids Recalls Children’s Coveralls Due to Choking Hazard
- Flocking, Screen Printing, Embroidery or DTF: Which Technique?
- Which embroidery technique is best for promotional clothing