


Start with 300 to 325°F for 15 to 20 seconds at medium pressure for most embroidered iron-on patches on cotton or poly blends, then adjust up to 320 to 350°F with a longer dwell for thicker fabrics like denim or canvas. Faux leather and PVC patches need lower heat, closer to 275 to 300°F, to avoid scorching. Before you press a single production piece, always test your settings on scrap fabric or an inconspicuous spot, and write down what worked.
TL;DR:
- Confirm the patch has a smooth, slightly glossy heat activated film; raw stitching indicates sew on backing or a need for Velcro instead.
- Preheat the lower platen for 20 to 30 seconds, remove lint and wrinkles, and cover the patch with butcher paper or a Teflon sheet.
- For hats, support the crown with foam or a block, use light to medium pressure, and choose sew on or Velcro backing for foam fronts.
- If a corner lifts, add five seconds at the same temperature before raising heat; for incomplete bonds, increase time first and stop at discoloration.
- For production, let each garment cool fully, then test one sample per material and run a cold wash after 24 hours to verify adhesion.
Table of Contents
- Heat, time, and pressure: starting ranges and how to adjust them
- How to check patch backing and prepare the garment
- Step-by-step pressing method for flat garments
- Applying patches to hats, curved surfaces, and heat-sensitive materials
- Troubleshooting and testing workflow for reliable results
- Lee Embroidery’s test-backed practices and washing guidance
- Speed versus durability: what we weigh before every press
- How we help you get tested, production-ready patches
- FAQ
- Sources
Heat, time, and pressure: starting ranges and how to adjust them
Every patch bond depends on three variables working together: temperature, dwell time, and pressure. Get one wrong and the patch lifts at the edges or scorches the fabric underneath.
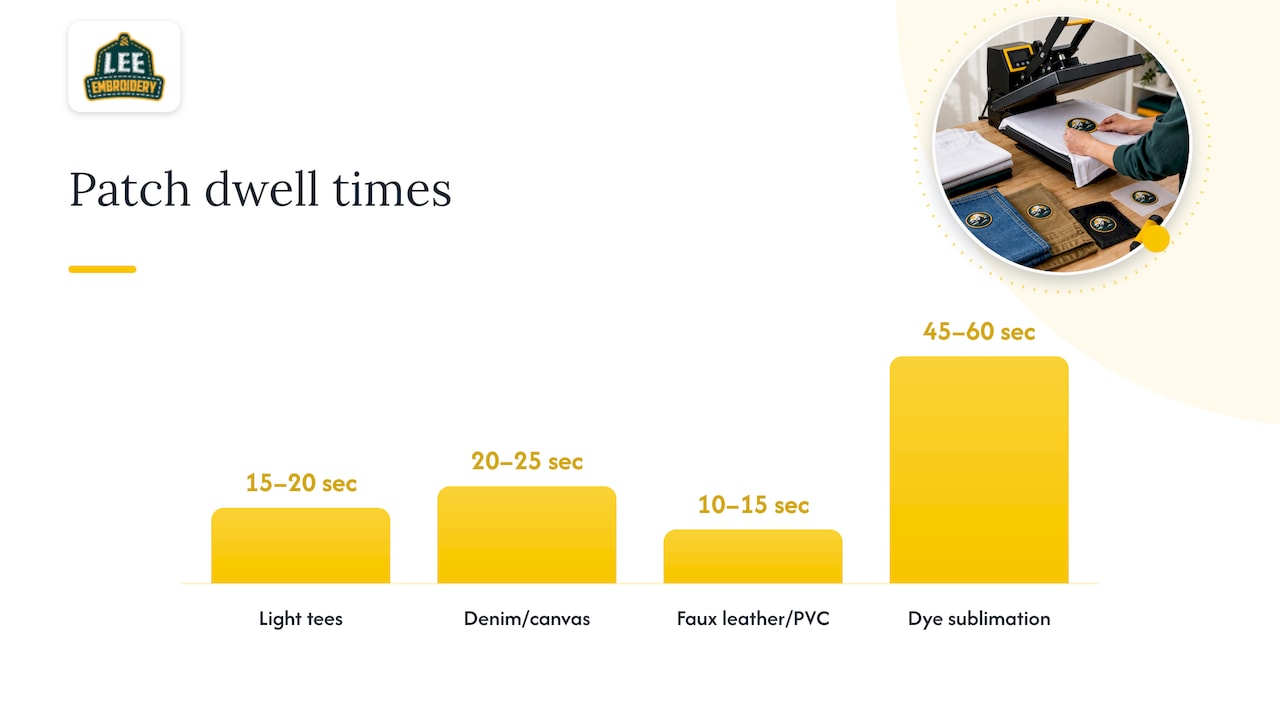
Heat presses typically regulate between 200 and 430°F, a wide enough range to cover vinyl transfers, embroidered patches, and sublimation projects. Vinyl transfers commonly run at 300 to 325°F for about 15 seconds, which lines up closely with what most embroidered iron-on patches need. Dye-sublimation blanks sit at the other end, often needing 385 to 400°F for 45 to 60 seconds on polyester, with ceramics and tumblers requiring even longer dwell times.
Here is a quick-reference starting point for common materials:
- Lightweight cotton or poly tees: 300 to 325°F, 15 to 20 seconds, medium pressure.
- Denim or canvas jackets: 320 to 350°F, 20 to 25 seconds, medium to firm pressure.
- Hat crowns and curved caps: 300 to 320°F on top, longer bottom-heat exposure, light to medium pressure.
- Faux leather or PVC patches: 275 to 300°F, 10 to 15 seconds, light to medium pressure to prevent melting or gloss loss.
Pressure is the variable most people skip, but the handle feel on a manual press tells you almost everything. Light pressure closes with little resistance. Medium pressure requires a firm but comfortable pull to latch. Firm pressure takes real effort to close and suits thicker, textured patches like chenille.
One in-house reference we rely on: infrared-verified iron-on patch temperatures by fabric type remove the guesswork that handheld irons introduce, since a household iron cannot hold a consistent surface temperature the way a calibrated press can.
How to check patch backing and prepare the garment
Before you press anything, confirm the patch actually has heat-activated backing. Here is the quick workflow:
- Flip the patch over and look for a smooth, slightly glossy film, often white or clear, covering the back.
- Press a fingernail into the film; heat-activated backing feels firm and slightly tacky, not fabric-soft.
- If there is no film or the back feels like raw stitching, the patch is sew-on only, or it needs Velcro backing instead.
- Lint-roll the garment surface to remove debris that can trap under the patch.
- Preheat the lower platen for 20 to 30 seconds to drive out moisture before placing the patch.
- Flatten seams and tuck zippers or trim out of the pressing area.
- Lay a protective sheet, either butcher paper or a Teflon sheet, over the patch before closing the press.
Skipping the preheat step is one of the most common reasons patches bubble later, since trapped moisture has nowhere to go once the adhesive activates.
Step-by-step pressing method for flat garments
Flat garments like t-shirts, jackets, and bags give you the most control, so this sequence works for nearly every embroidered or printed patch:
- Pre-press the garment for 2 to 5 seconds to clear wrinkles and residual moisture.
- Position the patch and secure it with heat-resistant tape if you need to hold placement during handling.
- Lay your protective sheet over the patch, then close the press smoothly rather than slamming it shut.
- Run the timer at your chosen starting setting, checking that the press seals evenly across the patch edges.
- Lift the press and peel according to backing type: hot peel for most vinyl and sublimation backings, cold peel for adhesives that need to set before release.
- If any corner lifts, re-press for 5 more seconds at the same temperature before increasing heat.
- For production runs, let the garment cool fully, then run a cold-wash test after 24 hours to confirm the bond holds.
Pro Tip: Keep a small notebook or phone note with the exact temperature, time, and pressure that worked for each fabric so you never have to re-test from scratch.
Our step-by-step iron-on patch guide covers timings that respect care labels on delicate fabrics, which matters most when you are pressing blends you have not worked with before.
Applying patches to hats, curved surfaces, and heat-sensitive materials
Hats do not sit flat, so a standard platen only contacts the crown unevenly, which risks creasing the fabric or leaving a faint scorch ring where pressure concentrated.
- A dual-heated hat press applies heat from both the top platen and a curved lower element, which activates the adhesive fully without pushing the top temperature as high.
- Use foam padding or a hat-shaped block underneath the crown to support the curve and distribute pressure evenly.
- Lower your top-plate temperature slightly compared to flat garments, since the bottom heat compensates.
- Keep pressure light to medium on structured caps to avoid flattening the front panel.
- When a hat’s foam front panel makes heat application risky, sew-on or Velcro backing is often the safer attachment choice.
Troubleshooting and testing workflow for reliable results
Most failed patches trace back to one of four problems: partial peel from insufficient time or pressure, scorch marks from too much heat or dwell, bubbling from trapped moisture or an incompatible coating, and ghosting from the patch shifting mid-press.
- Change only one variable at a time: adjust temperature by about 10°F or dwell time by 5 to 10 seconds, then retest.
- Increase time before increasing temperature when a bond feels incomplete, since extra heat raises scorch risk faster than it improves adhesion.
- Stop adjusting upward once you see any discoloration or glossy sheen on the fabric, that is your ceiling.
- Press one test sample per material type, then one full production sample, before committing to a bulk run.
A sample-first approach like this is standard practice across the industry because testing on scrap before a production run catches most problems before they cost you a finished garment.
Lee Embroidery’s test-backed practices and washing guidance
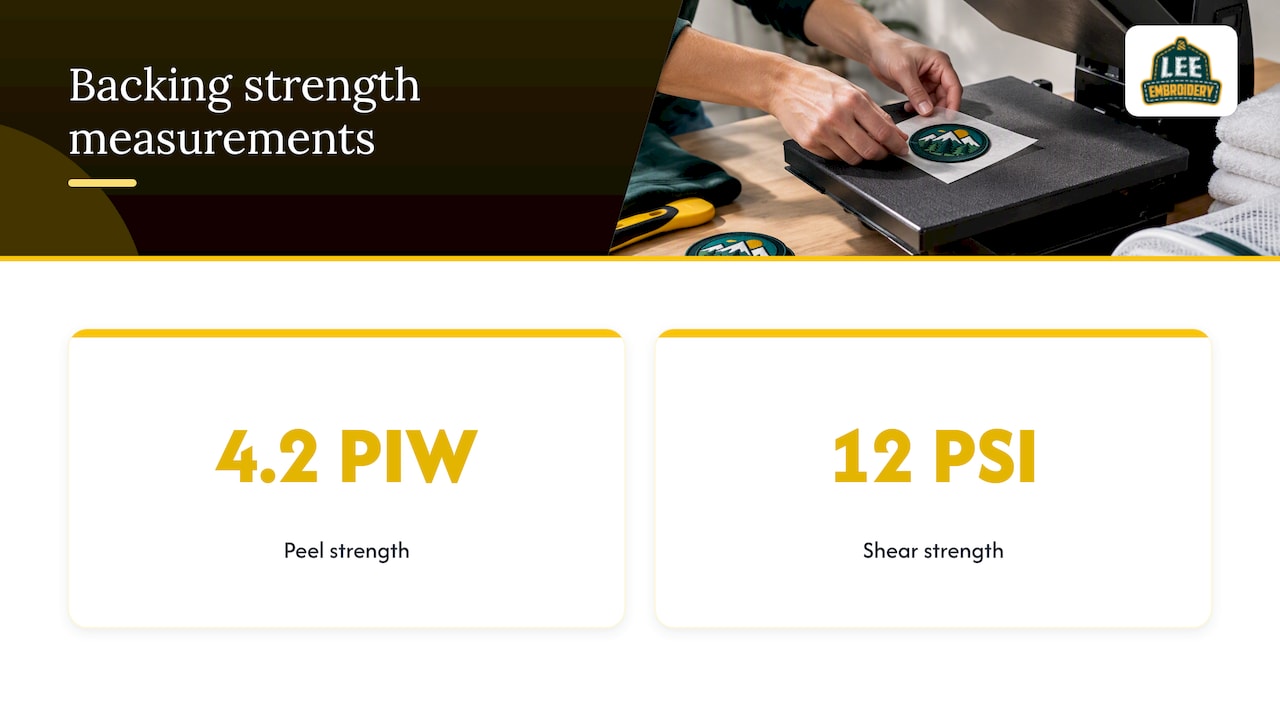
Our infrared-verified iron-on patch temperature guidance is based on direct fabric testing rather than generic charts, providing numbers specific to the material you’re pressing. For patches that use Velcro backing instead of heat alone, we measure 4.2 PIW peel strength and 12 PSI shear strength, figures that inform both our pressing recommendations and our patch washing instructions. Complimentary samples are available before bulk orders, allowing you to run your own heat test on your actual fabric instead of guessing.
Speed versus durability: what we weigh before every press
For uniforms, workwear, or anything that sees weekly laundering, we favor a slightly longer dwell time over a faster cycle, because a stronger bond on day one saves far more time than a quick reprint later. A sample-first workflow still gets you to the fastest safe setting, it just gets you there without guessing.
— Bilal
How we help you get tested, production-ready patches
Requesting a free sample before you order means you test our actual backing on your actual fabric, not a generic spec sheet, which cuts down on reprints and wasted press time. Our Custom Patches line starts at $99 and includes a rapid quote turnaround, so you can move from design to a tested sample quickly. If you decide printed decoration suits your project better than a patch, screen printing and DTG each carry their own cost and durability tradeoffs worth weighing first.

Reach out for a sample or a production-backing recommendation, and we’ll help you land on settings that hold up wash after wash.
FAQ
What are the best heat press settings for sublimating shirts?
Sublimation on polyester blanks typically starts at 385 to 400°F for 45 to 60 seconds, which differs from the 300 to 325°F range used for embroidered iron-on patches. Always confirm the blank’s coating before pressing, since ceramics and tumblers need longer dwell times at similar temperatures.
How hot does your iron need to be for iron-on patches?
A household iron set to its cotton or high setting roughly approximates 300 to 325°F, but a dedicated heat press holds temperature and pressure far more consistently than handheld ironing. For production runs or anything you plan to wash repeatedly, a calibrated press gives a more reliable bond.
Can I heat press vinyl on 100% polyester?
Yes, vinyl transfers generally press at 300 to 325°F for about 15 seconds, and polyester tolerates this range well as long as you protect the surface with a sheet to prevent scorching. Always test on a scrap of the same polyester blend first, since dye migration can occur at higher heat.
How do you make iron-on embroidered patches?
An iron-on embroidered patch starts with a digitized design stitched onto backing fabric, then a heat-activated adhesive film is applied to the reverse side so it bonds when pressed at the right temperature and dwell time. We handle the embroidery and backing application as part of our embroidered patches production process.
Sources
- Heat Press – makerhub
- Best sublimation heat press settings for every blank – Sublimation Co.
- Cyber hat press product page – Hydbond



One Comment