To stop a patch from unraveling right now, trim the loose fibers close to the edge, then apply a washable fray sealant or tack-stitch the border with a few quick whip stitches. Synthetic edges respond well to a brief heat seal instead. Pick your method by material: natural fibers and embroidery thread take glue or stitching best, while synthetic woven or printed edges often seal cleanly with gentle heat.
TL;DR:
- Apply washable, flexible sealant in a thin line along the edge and let it dry for the bottle’s stated time, usually a few hours.
- For a lasting hand repair, use small, even polyester whip stitches about an eighth of an inch apart, hiding knots underneath when possible.
- Heat sealing suits synthetic edges, but test a scrap first and use only brief contact; excess heat can scorch or warp the patch.
- For uniforms and frequently washed items, choose a sewn patch with a merrowed border; adhesives can loosen under hot washes and dryer heat.
- Replace the patch when its base fabric tears, its design distorts, or the same spot needs repair two or three times.
Table of Contents
- Why patch edges start to fray
- Quick fixes checklist (fast, temporary, low-skill options)
- Step-by-step repair workflow for frayed edges
- Preventive finishes and backing choices that reduce future fray
- Tools and materials to buy: reliable products and safety tips
- When DIY is enough and when to choose a professional replacement
- Lee Embroidery: replacement patches and durable finishing options
- FAQ
- Quick links to internal resources and partner references
- Sources
Why patch edges start to fray
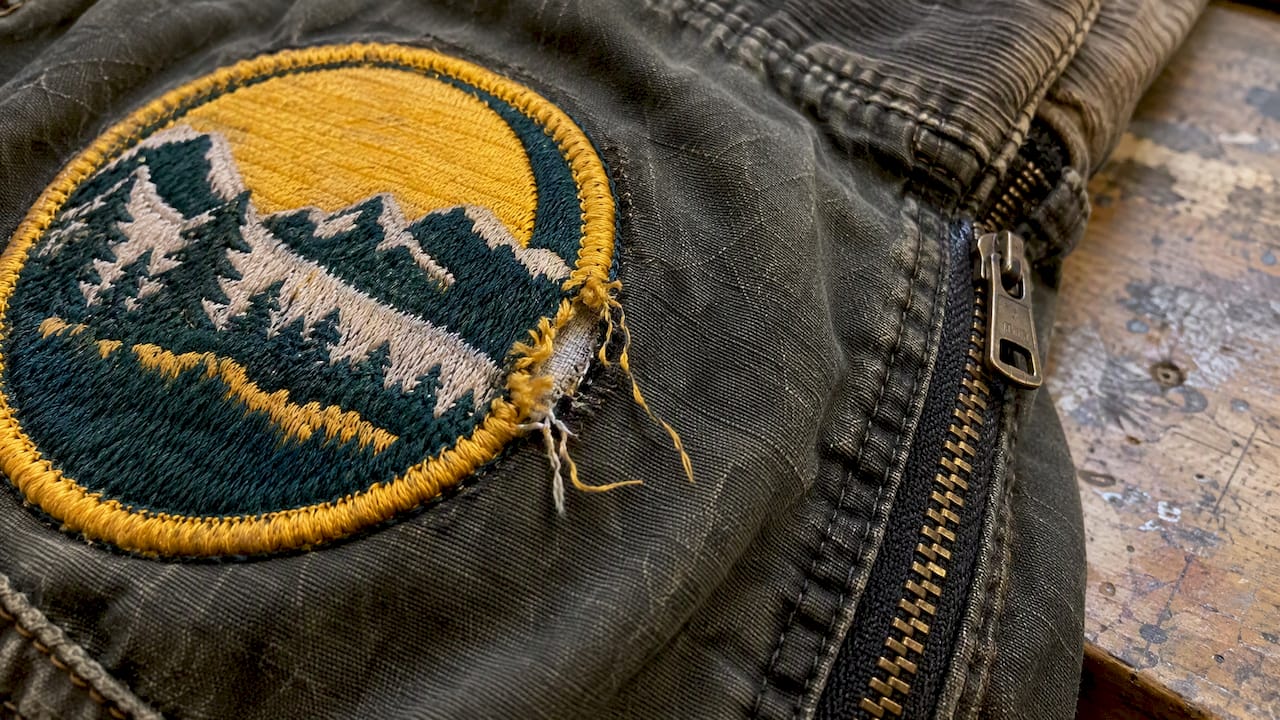
Fraying usually starts because the edge thread or fabric weave has nothing holding it in place once it gets cut, washed, or rubbed against a jacket zipper or backpack strap. Embroidered patches fray when the satin stitch border wears thin or the backing fabric shows through. Woven and printed patches fray along the raw fabric edge if it was heat cut instead of merrowed. Repeated washing, dryer heat, and everyday abrasion from bags or sleeves all speed up the process, and a patch sewn on by hand without reinforcing the border is especially exposed.
Quick fixes checklist (fast, temporary, low-skill options)
Before you commit to a full repair, these fixes buy time and stop the damage from spreading.
- Trim first: snip any loose yarns or threads flush with the edge using small embroidery scissors so nothing catches and pulls further.
- Fabric glue or fray sealant: run a thin line along the very edge, not the face of the patch, and let it dry flat for the time listed on the bottle, usually a few hours, before wearing or washing.
- Tack or whip stitch: use a matching or clear polyester thread and small, even stitches about an eighth of an inch apart along the worn section; this holds even after the sealant wears down.
- Heat seal for synthetics: a lighter flame passed quickly and lightly, or a hot knife, can melt and fuse a synthetic edge, but test on a scrap piece first since too much heat scorches or warps the patch.
- Iron-on or fusible interfacing: works well on thin, flat patches but won’t hold up on thick embroidered borders where the stitching itself has come loose.
Pro Tip: Always work on a flat, heat-safe surface and keep a damp cloth nearby when heat sealing. A few seconds of contact is enough; longer exposure melts the patch unevenly.
Step-by-step repair workflow for frayed edges
A lasting repair takes a little more time but holds up far better than a quick seal.
- Identify the patch type and garment fabric. Embroidered, woven, printed, PVC, and leather patches each respond differently, and the garment underneath (cotton twill, denim, nylon) affects how you stitch or bond.
- Clean and prep the edge. Trim loose fibers, wipe away lint or old adhesive residue, and press the patch flat if it has curled.
- Repair embroidered or woven edges by re-overcasting. Use a whip stitch or small satin stitches over the worn section to mimic the original merrow border, working from the underside when possible to hide knots.
- Add a narrow fabric binding for heavily worn patches. A thin strip of bias tape stitched around the perimeter covers damage that stitching alone can’t fix.
- Bond and stitch fabric-backed patches. Apply a washable fabric bonding agent to the back edge, press, then reinforce with an overcast or top stitch once the bond sets for a repair that survives regular washing.
- Know when to stop repairing. If the base fabric has torn through or the design itself is distorted, a repair won’t hold and a replacement with a professionally finished edge is the better route.
Pro Tip: Stitch from the underside of the patch whenever the garment allows it. Your repair stays invisible from the front and the knot sits against fabric instead of skin or clothing.
Preventive finishes and backing choices that reduce future fray
The border and backing you choose when a patch is made (or remade) decides how long that edge actually lasts. A merrowed or embroidered border wraps the raw edge in tight satin stitching, which resists fray far more reliably than a laser-cut edge left exposed, especially on items that see frequent washing or abrasion.
Backing choice matters just as much as the border:
- Sew-on backing holds the strongest over years of wear and washing, since stitching distributes stress across the whole perimeter.
- Iron-on (fusible) backing is fast to apply but can loosen at the edges with repeated hot washes or dryer cycles.
- Adhesive or peel-and-stick backing works for short-term or single-use applications, not for anything that gets laundered regularly.
- Velcro backing gives repeatable attachment and removal, and when it’s produced to professional specs rather than applied with generic hook-and-loop tape, the peel and shear strength holds up far better over time.
For uniforms, bags, or anything that goes through frequent washing, a sew-on patch with a merrowed border is the most durable combination. Leather and heavy canvas patches do better with sew-on or riveted attachment since adhesives struggle to bond to those surfaces long-term. Whatever backing you choose, washing with the right method for that backing type keeps the edge from weakening early, since hot water and high dryer heat are the two fastest ways to loosen both stitching and adhesive.
Tools and materials to buy: reliable products and safety tips
A few well-chosen supplies make the difference between a repair that lasts and one you’ll redo in a month.
- Fray sealant or fabric glue: choose one labeled washable, flexible once dry, and clear drying so it doesn’t yellow or stiffen the fabric.
- Thread: polyester thread resists UV fading and holds tension better than cotton for anything worn outdoors.
- Needles: a heavy-duty or leather needle gets through canvas, denim, and leather patches without bending; a standard sharp needle is fine for cotton and embroidery thread.
- Cutting tools: pinking shears reduce fraying on raw fabric edges before you seal them, while small embroidery snips give you precision on tight curves.
- Heat tools: a hot knife or wood-burning tip seals synthetic edges cleanly, but always ventilate the area and keep flammable material away from the tip.
Home tools handle small repairs well, but a frayed patch with a damaged design or torn backing fabric usually needs the kind of consistent, tight stitching that only industrial merrow or laser-edge equipment produces reliably.
When DIY is enough and when to choose a professional replacement
A quick stitch or a dab of sealant is the right call for a patch that’s starting to fray but still looks sharp. Once you’re repairing the same spot two or three times, or the design itself has distorted, that patch has reached the end of its useful life. Uniforms and anything representing a brand or team benefit from a clean replacement rather than a visibly mended one. Approving a sample first lets you confirm the border and backing will hold up before a full batch ships, which matters most for items that see daily wear.
— Bilal
Lee Embroidery: replacement patches and durable finishing options
When a patch has frayed past the point of a clean repair, we build replacements with the border and backing matched to how hard that patch gets worn. We offer patches made from various materials, with multiple border and backing options to suit different uses.

- We provide samples before production to allow checking the edge finish and backing firsthand.
- Our quote turnaround is timely to help you start reorders without unnecessary delay.
- We cover every patch type in one order, from embroidered patches to leather and PVC.
If your current patch has torn through or keeps fraying no matter how often you repair it, start a quote on our custom patches page and we’ll match the border and backing to how that patch actually gets used.
FAQ
Does fabric glue work to stop fraying?
Fabric glue works well as a short-term fix when it’s a washable, flexible formula applied thinly along the edge rather than across the face of the patch. It won’t hold up as long as stitching on items that see heavy washing or abrasion, so treat it as a stabilizer rather than a permanent repair.
What are types of patching?
Patches come in several construction types, including embroidered, woven, printed, PVC, leather, and chenille, each with different fray resistance based on the material and the border used. The border, whether merrowed, embroidered satin, or laser cut, affects durability as much as the patch material itself.
What are the best patches for clothing?
Embroidered patches with a merrowed or embroidered satin border tend to hold up best on clothing that gets washed and worn often, since the stitched edge resists fraying better than a raw or laser-cut edge. For leather jackets or canvas bags, a sew-on leather or PVC patch handles abrasion well.
How do I patch clothes by hand?
Trim any loose threads, position the patch where you want it, and secure it with a whip stitch or small running stitch around the entire border using polyester thread. Stitching from the underside when the garment allows it keeps knots hidden and the repair more durable than glue alone.
Quick links to internal resources and partner references
Sources
- The Customized Patches (Maps)
- Laser cut patch edges
- Velcro patch backing
- Patch washing instructions
- Embroidered patches
- Custom patches
- Patch backing types
- Badge production process