Submit six details and you’ll get a real number back within a day or two: patch type, exact size, quantity, backing style, color and special-feature notes, and an artwork file. In return, a solid manufacturer sends you a free digital proof plus a price estimate reflecting your specs. That price shifts based on quantity, size, and any extra features you add, so treat the first quote as a starting point, not a locked-in figure.
TL;DR:
- The most cost-effective way to get an accurate patch quote is by providing detailed specs including patch type, size, quantity, backing, colors, features, and artwork file from the start.
- Quantity greatly influences price per patch due to tiered pricing and lower setup costs spread across larger orders, making consolidating designs into bigger batches advantageous.
- Material choices and special features like metallic thread or laser-cut borders add significant costs, requiring clear upfront notes to avoid surprises in the estimate.
- Typical turnaround for a patch quote is one to two business days once all specifications are complete, with production taking an additional one to two weeks based on complexity and order size.
- Small orders often have minimum quantities around two dozen, but many vendors support small runs, samples, or rush requests if explicitly asked during the quote process.
Table of Contents
- What to Include in a Patch Quote Request
- How Do Suppliers Calculate Patch Pricing?
- How Long Does a Patch Quote and Order Actually Take?
- Preparing Artwork Files for an Accurate Proof
- From Submission to Shipped Patches: What Happens Next
- What Should You Expect to Pay for a Custom Patch?
- Payment Methods and How the Payment Process Works
- Cancellations, Order Changes, and Refund Policies
- Why Going Direct to the Manufacturer Speeds Up Your Quote
- Ready to Request Your Patch Quote? Here’s What to Send
- Sources
- FAQ
What to Include in a Patch Quote Request
A patch quote request is only as good as the details you feed it. Vague specs get vague numbers back, and vague numbers turn into three rounds of emails before anyone gets a real price. Give a manufacturer the six essentials below and you’ll usually get an accurate quote on the first pass.
Patch type. Each material fits a different job:
- Embroidered patches for a classic textured look on uniforms, jackets, and team gear.
- Woven patches when your design has fine text or thin lines that stitching would blur.
- Printed patches for photo-realistic art or gradients that embroidery can’t replicate.
- PVC patches for outdoor or tactical gear that needs to survive weather and abrasion.
- Chenille patches for the raised, varsity-letter look on letterman jackets.
- Leather patches for a premium finish on hats, bags, and branded apparel.
Size. Measure width by height in inches, from the widest and tallest points of the design. A 3-inch by 2-inch oval patch and a 3-inch circle price differently even though the width matches, since coverage area drives cost more than a single dimension does.
Quantity. Most manufacturers price in tiers, commonly starting around two dozen pieces and climbing into the hundreds or thousands. Price per piece drops as volume rises because setup and digitizing costs get spread across more units.
Backing. Sew-on suits uniforms that get laundered often. Iron-on works for one-time apparel projects. Velcro fits swappable gear like tactical vests or team jerseys. Peel-and-stick suits temporary promotional use.
Colors, thread type, and special features. Note your color count, whether you want metallic thread, and flag any 3D puff embroidery, glow-in-the-dark thread, or laser-cut borders up front.
Artwork file. Attach whatever you have, even a rough sketch, and note the file type so the vendor knows what they’re working with.
How Do Suppliers Calculate Patch Pricing?
Quantity is the single biggest lever in any patch quote. Most manufacturers apply tiered pricing, so per-piece cost drops sharply once you cross into higher order bands. A one-time digitizing or setup fee often appears as a flat charge on top of the per-unit price, separate from the patches themselves.
Size and stitch coverage matter almost as much as quantity. A patch with dense embroidery across its full surface costs more to produce than one with the same outline but mostly open background, because stitch count (not just outer dimension) drives machine time. For printed patches, the relevant variable is print area rather than stitch count, but the logic is the same: more coverage, higher cost.
Material and backing choices carry their own premiums, and special features add line items you should expect to see broken out:
- Metallic or glow thread typically adds a per-color surcharge.
- 3D puff embroidery adds machine time and cost.
- Laser-cut borders cost more than a standard merrowed edge.
- PVC and leather patches generally price higher than basic embroidered ones due to mold or tooling work.
Rush production fees, shipping, and any applicable sales tax show up as additional charges beyond the base patch price, so ask for an all-in total rather than just a per-piece figure.
Statistic Callout: Digitizing or setup fees usually function as a fixed one-time charge, meaning their share of your total cost shrinks the larger your order gets. Smaller orders absorb that flat fee far less efficiently, per unit, than larger orders do. It’s a strong reason to consolidate designs into one larger batch order when your budget allows it, rather than splitting them across several small runs.
How Long Does a Patch Quote and Order Actually Take?
A responsible manufacturer turns around a quote in one to two business days once you submit complete specs. Incomplete requests take longer, simply because someone has to email you asking for the missing size or backing detail before pricing can start.
- Submit your specs and artwork. Include everything listed in the checklist above.
- Receive your digital proof and price. Expect this within one to two business days for a straightforward design.
- Review and request revisions. Most vendors include a reasonable number of proof revisions before charging extra.
- Confirm and move to production. Full manufacturing timelines typically run one to two weeks depending on quantity and complexity, separate from the quote turnaround itself.
Minimum order quantities vary by patch type and vendor, but many manufacturers set the floor somewhere in the two dozen to one hundred piece range. Some make exceptions for samples or rush test runs, so ask directly if your project is small.
Pro Tip: Label your deadline clearly in the request itself, not just in a follow-up email. Write something like “Need in hand by March 20” right in the notes field so the vendor can flag rush fees or turnaround conflicts before you’re locked into a quote.
Preparing Artwork Files for an Accurate Proof
File quality determines how close your first proof lands to what you actually imagined. Vector files, meaning AI, EPS, or SVG format, give a manufacturer clean lines they can scale to any patch size without quality loss. If vector isn’t available, a high-resolution PNG or TIFF works, but keep it at 300 DPI or higher at the actual output size, not just at screen resolution.
A few habits save you a revision round:
- Outline all fonts before sending, so missing typefaces on the vendor’s end don’t shift your layout.
- Provide exact color references using Pantone or HEX codes rather than describing colors in words.
- Mark which elements should be stitched versus printed if you’re working with a hybrid patch style.
- Include a scale reference or exact dimensions directly on the file, not just in your notes.
- Flag any textured, metallic, or layered effects so they don’t get flattened into a single color during digitizing.
If all you have is a photo or hand sketch, that’s workable, but include a written color list and rough size intent so the vendor can still estimate reliably.
From Submission to Shipped Patches: What Happens Next
Once your request lands, the manufacturer reviews the artwork and begins digitizing it into a stitch-ready file. That file generates your digital proof, showing colors, placement, and stitch detail before anything gets produced.
- Artwork review and digitizing convert your design into production-ready instructions.
- Proof approval happens after you sign off, usually within one or two revision rounds.
- Payment is typically collected as a deposit or full payment before production starts, depending on order size.
- Production and quality control follow, with final inspection before packing.
- Shipping closes the loop, and expedited options are usually available if you ask when you place the order.
What Should You Expect to Pay for a Custom Patch?
Patch pricing swings widely based on size, quantity, and complexity, but a few reference points help set expectations before you request a quote. A small embroidered patch, roughly 2 to 3 inches, in a modest quantity often lands in the low single digits per piece once you factor in setup costs spread across the run. Larger jacket-back patches with heavy stitch coverage cost meaningfully more per unit, both because of the size and because full coverage embroidery takes longer to produce.
Custom patches from Leeembroidery start from $99 for an order, which reflects the reality that most patch pricing is quantity-driven rather than a flat per-unit rate you can quote in isolation. PVC and leather patches typically sit above basic embroidered pricing because of tooling and material costs. Woven patches, with their flatter, sharper detail, often price close to embroidered patches for smaller designs but can pull ahead when a design has fine text or thin lines that would blur badly if stitched.
Special features move the number further. Metallic thread, 3D puff, and laser-cut borders each add incremental cost on top of the base price, and a design with several of these stacked together will land noticeably higher than a plain single-color patch of the same size. This is exactly why a detailed quote request matters: two patches that look similar in a rough sketch can price hundreds of dollars apart once stitch count, materials, and features actually get calculated.
Payment Methods and How the Payment Process Works
Custom patch orders typically move through a straightforward payment sequence: you approve a digital proof, then submit payment before production begins. Manufacturers commonly accept credit and debit cards through an online checkout, along with invoiced payment for larger business orders. Some vendors also support digital payment platforms for smaller transactions, similar to standard online payment processing used across e-commerce generally.

For bulk or business orders, expect a deposit structure rather than a single lump payment. A partial deposit at proof approval, with the balance due before shipping, is common practice and protects both sides. It gives the vendor confirmed commitment before committing machine time, and it gives you a chance to inspect the final proof one more time before your full payment goes through.
Ask specifically how your vendor handles payment timing when you submit your quote request, since policies differ by order size. A 50-piece individual order and a 5,000-piece corporate order rarely follow the same payment schedule, and knowing this upfront avoids a surprise when your proof gets approved and an invoice lands in your inbox. Keep records of every proof approval and payment confirmation, since these become your reference point if a dispute arises over what was actually approved before production started.
Cancellations, Order Changes, and Refund Policies
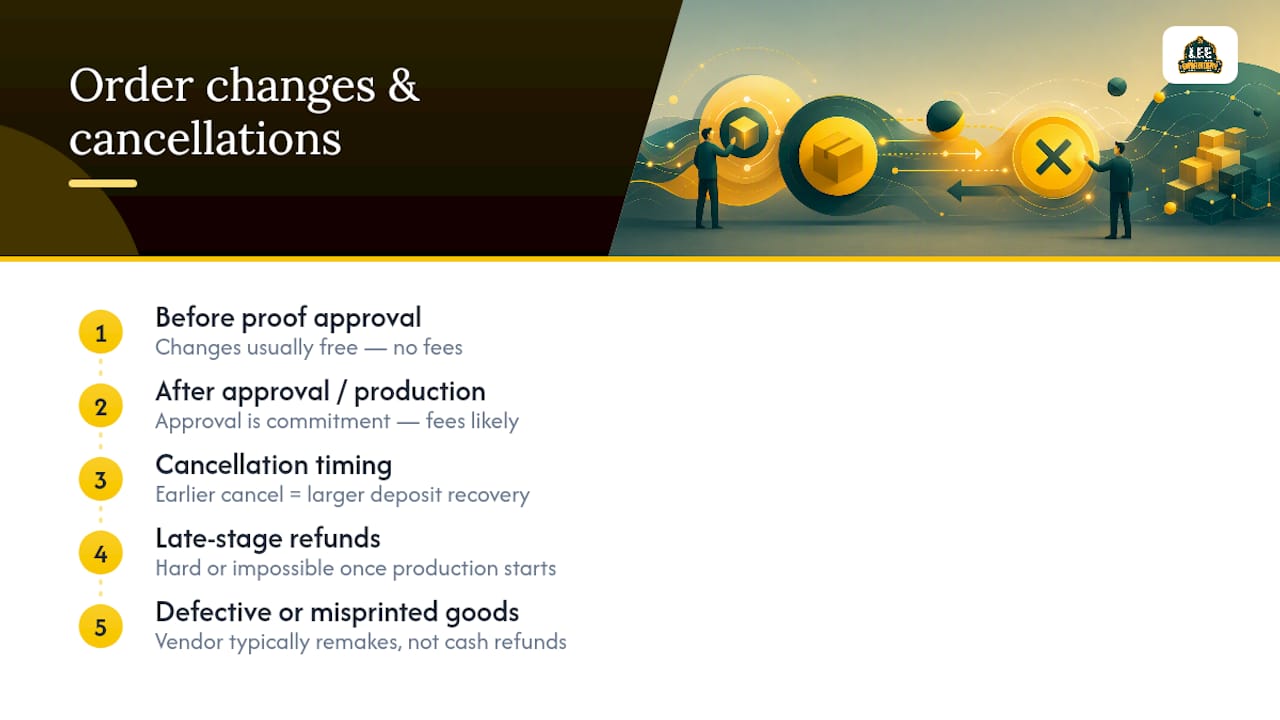
Changes are easiest, and usually free, before you approve the digital proof. Once you sign off on a proof and production begins, most manufacturers treat that approval as a firm commitment, since digitizing and material cutting are already underway at that point.
Cancellation windows vary by vendor, but the general pattern holds across the custom goods industry: the earlier you cancel, the more of your deposit you’re likely to recover, and once physical production has started, refunds become difficult or impossible because the materials and labor are already committed to your specific design. Ask your vendor directly what their cancellation window looks like and get it in writing before you approve anything.
Changes after order confirmation typically incur a fee, since altering an already-digitized design means redoing part of the setup work. If you catch an error in your own specs after approval, flag it immediately. Vendors are generally more flexible about accommodating a fast correction than a late-stage redesign. For refunds on defective or misprinted goods, most reputable manufacturers will remake the affected patches rather than issue a cash refund, since replacement protects the vendor’s quality standards while still making the customer whole.
Why Going Direct to the Manufacturer Speeds Up Your Quote
Every extra layer between you and the embroidery machine adds a round of email and a markup. Working directly with customers, the manufacturer handles the process from artwork review through embroidered, PVC, leather, woven, printed, and chenille production, cutting out the handoff delays a middleman adds. Rapid quote turnaround and complimentary samples let you verify color and scale before committing to a full run. For complex or time-sensitive projects, going direct is usually the better call, since every question gets answered by the people actually running the machines.
— Bilal
Ready to Request Your Patch Quote? Here’s What to Send
You already know the checklist: patch type, exact size, quantity, backing, color and feature notes, and an artwork file, even a rough one. That’s all a manufacturer needs to send back a free digital proof and a real price, not a placeholder range. Complimentary samples are often available so you can check color accuracy and stitch quality with your own hands before committing to a bulk order.

Once you submit your specs, expect artwork review, a digital proof, and a quote turnaround measured in business days, not weeks. From there it’s proof approval, a deposit or full payment depending on order size, and production. If you’re ready to see real numbers against your design, submit your custom patch quote request directly, or browse embroidered patch options if you’re still narrowing down which patch type fits your project.
Sources
FAQ
How Do I Request a Patch Quote?
Send the manufacturer your patch type, exact size, quantity, backing style, color and feature notes, and an artwork file. A complete patch quote request submitted this way typically returns a digital proof and price within one to two business days.
How Much Does It Cost to Get Patches Made?
Cost depends heavily on size, quantity, material, and special features like metallic thread or 3D puff embroidery. Custom patches through Leeembroidery start from $99 per order, with the final price shaped by the specs in your quote request.
What Are the Main Types of Custom Patches?
Embroidered, woven, and printed patches cover most common uses, though PVC, chenille, and leather patches are widely used too. Embroidered patches give a classic textured finish, woven patches handle fine detail and text better, and printed patches reproduce photo-realistic art that stitching can’t replicate.
Is It Safe to Order Patches Through an Online Quote Form?
Yes, provided the vendor gives you a clear digital proof to approve before production and states its payment and cancellation terms plainly. The FTC’s guidance on consumer reviews also recommends checking that any vendor reviews you rely on are transparent about how they were collected.
Do I Need to Order a Minimum Quantity?
Most manufacturers set a minimum order quantity, often somewhere between two dozen and one hundred pieces depending on patch type. Exceptions for samples or small rush runs exist at many vendors, so ask directly if your project falls below the standard minimum.