For a durable, legible leather patch hat, choose a structured cap, pick full-grain leather if you want natural aging or a high-quality faux leather for a consistent budget-friendly look, and attach the patch with hand stitching when the hat will see heavy use. Always send vector artwork and request a physical sample before committing to full production. These four decisions determine whether your finished hat looks expertly made or falls apart within a season.
TL;DR:
- Structured caps with reinforced front panels better support leather patches, preventing wrinkling or bubbling over time, especially during heavy or frequent use.
- Full-grain leather ages into a patina and can last several years with seasonal conditioning, whereas faux leather typically shows uneven fading within two to three years.
- Debossing provides the most durable, long-lasting logo imprint, while laser engraving handles fine details but offers a tonal burn rather than true color.
- Hand stitching is the most durable attachment method for outdoor or heavy-wear hats, whereas heat press or adhesive-backed patches are suitable for retail or light use.
- Sending vector files and requesting a physical sample before full production helps prevent costly rework and ensures the design and materials meet expectations.
Table of Contents
- Which hat styles hold leather patches best
- Leather patch materials and finishes: full-grain vs faux
- Decoration methods: deboss, emboss, laser engraving, and screen printing
- Attachment methods: hand stitching vs heat press vs sewn borders
- Artwork and file prep: what to send your patch maker
- Small-batch production workflow and options for one-offs or short runs
- Sizing, placement, and measuring for readable leather patches
- Care, conditioning, and expected longevity
- History and cultural significance of leather patch hats
- Common customization options and trends in leather patch hats
- Cost factors influencing leather patch hat pricing
- Typical turnaround times for custom leather patch hat orders
- Lee Embroidery’s sample-first workflow and common customer choices
- How Lee Embroidery can make your leather patch hats
- Sources
- FAQ
Which hat styles hold leather patches best
Not every cap is built to carry a leather patch well. The front panel needs to stay flat and stable, or the leather will wrinkle, bubble, or pull loose over time. Structured front panels use buckram or a stiffening fabric fused behind the two front panels, which keeps the crown’s shape and stops the puckering that weakens a patch’s presentation. That reinforcement is exactly why trucker, structured snapback, and five-panel caps are the preferred canvas for leather patches: the stable surface holds the patch upright and readable, whether it is stitched or pressed on.
Softer, unstructured crowns can still work, but only with added reinforcement behind the panel, since a floppy front will not support the weight or stiffness of leather cleanly. Canvas and twill fronts sew easily and press well; foam-front trucker caps sew fine but need care with heat, since foam can flatten or discolor under a hot press.
A quick way to match a style to your project:
- Retail merch: structured five-panel or snapback for a clean, photo-ready front.
- Outdoor staff or work crews: trucker caps with mesh backs and a stitched leather patch for durability.
- Gifts or one-off orders: any structured cap with a heat-pressed patch, since it will see lighter wear.
Leather patch materials and finishes: full-grain vs faux
Full-grain leather shows a natural, irregular grain pattern, has visible fiber structure along the cut edge, and feels noticeably thicker and stiffer than faux leather, which tends to have a uniform, repeating texture and a thinner, more flexible feel. That difference is not just cosmetic. It determines how the patch looks in year one versus year three.
Full-grain leather can remain presentable for several years with normal wear and seasonal conditioning, developing a patina that many buyers actually want. Faux leather typically holds its original look for two to three years before showing uneven fading, which matters if you are selling merchandise you expect customers to wear for a long stretch.
- Full-grain: ages into a richer, personal look; best for brands leaning into a heritage or outdoor identity.
- Faux leather: stays visually consistent across a batch, costs less, and skips the conditioning routine.
- Edge treatments: raw edges look rugged but fray faster, burnished edges resist wear better, and stitched borders add both durability and a finished look.
- Thickness: thinner leather (around 1 to 1.5 ounces) sews and folds more easily around curved fronts; thicker leather holds a deboss impression more sharply but is harder to stitch by hand.
Decoration methods: deboss, emboss, laser engraving, and screen printing
Each decoration method changes how your logo reads today and how it ages over the coming years. Choosing the right one comes down to your artwork’s detail level and how much color you actually need.
- Debossing presses your design into the leather, leaving a recessed, tactile mark. It is the most durable option for bold logos and holds up well over years of wear, but fine serifs or thin lines can lose definition once pressed into the mold.
- Laser engraving handles fine detail and thin lines that a deboss mold would blunt or make too costly to produce. The result is a burned, tonal look rather than true color, which fits minimalist or single-tone logos particularly well.
- Embossing raises the design instead of pressing it in, giving a softer, heritage feel. It is less common on hats because raised leather on a curved cap front is more prone to catching and flattening.
- Screen printing or color fills deliver full color, which none of the other methods can, but the ink sits on top of the leather rather than becoming part of it, so it will not patina the way debossed or engraved leather does and can wear thin with repeated contact.
Pro Tip: Ask for a proof at actual size before production, since a logo that looks sharp blown up on a screen can lose its fine strokes once it is scaled down to a two-inch patch.
Attachment methods: hand stitching vs heat press vs sewn borders
How you attach the patch matters as much as the leather itself. Each method carries its own durability profile, so match it to how the hat will actually be worn.
- Hand stitching is the most durable method and the one to choose for hats headed for heavy outdoor use, repeated washing, or daily wear, since the thread holds the patch through flexing and friction that adhesive alone cannot survive.
- Heat press or adhesive backing gives a clean, seamless look and works well for retail merch or gifts, but it can weaken under high heat, heavy machine washing, or prolonged sun exposure.
- Sewn borders and merrowed edges add a layer of protection around the patch’s perimeter, improving longevity while also hiding any inconsistencies in the leather’s cut edge.
- Combined attachment (heat pressing first, then reinforcing the edges with stitching) gives you the clean finish of a press with the hold of stitching, and it is worth the extra step for hats intended for a multi-year lifespan.
Artwork and file prep: what to send your patch maker
Getting your artwork right the first time saves you a round of costly rework. Vector files (AI, EPS, or PDF) are non-negotiable, since molds for debossing and laser paths for engraving both need clean vector lines rather than a pixel-based image that would blur at the edges.
- Send vector files, not JPEGs or PNGs, so your patch maker can build an accurate mold or laser path.
- Keep letter heights and line weights above the minimum: text with thin serifs under roughly a quarter inch in height tends to lose definition once it is debossed or molded.
- Simplify color where leather is involved: leather itself only takes deboss, emboss, laser, or screen-applied color fills, so a design with gradients or many Pantone shades usually needs to shift to a screen-printed treatment.
- Request a physical sample, not just a digital proof, since a screen mockup cannot show you how a deboss will actually catch the light or how a laser mark will read against the grain.
Small-batch production workflow and options for one-offs or short runs
A small order does not mean a chaotic process. A dependable production workflow moves through concept, vector file approval, a sample or mold check, patch production, attachment to the hat, and a final inspection before the order ships.
The decoration method and mold or die required change your minimums and unit cost directly: a custom deboss die typically needs a higher quantity to make sense financially, while laser engraving and screen printing scale down more comfortably for a handful of hats.
- Request a rapid quote with your vector file attached so a manufacturer can flag any line weight or color issues immediately.
- Ask for a complimentary sample before committing to the full run, since sample approval matters more than chasing the lowest unit price for short runs.
- Give clear mockup notes, including exact placement and scale, to avoid a second round of proofs.
- Check photos of the sample under normal light before approving, since screen colors and in-hand leather tone often differ slightly.
Sizing, placement, and measuring for readable leather patches
Size and placement decide whether a patch reads clearly from a few feet away or just looks cluttered. As a general range, most structured caps carry patches comfortably between two and a half and three and a half inches wide, with the exact scale depending on how much detail the logo carries and how curved the front panel is.
- Center the patch horizontally and set it slightly above the brim’s midpoint so it reads naturally rather than looking too low.
- Flatter fronts (five-panel, snapback) support wider patches since there is less curvature to distort the design.
- More curved fronts (traditional trucker) call for a narrower patch or extra margin so the edges do not pucker.
- Test placement on a physical mockup before production, adjusting for how the crown curves once the hat is actually on a head rather than lying flat.
Care, conditioning, and expected longevity
Leather patches reward a little maintenance with a much longer life. Spot clean with a damp cloth rather than machine washing the hat, and keep the patch dry when hand washing the rest of the cap, since machine washing and dryers are the fastest way to warp or crack a leather patch.
- Condition full-grain leather once per season with a neutral leather cream, and skip petroleum-based dressings, which can darken the leather unevenly.
- Keep moisture in check if you are also tooling or finishing blank leather yourself: leather should stay damp rather than soaked, and metal filings or the wrong containers can permanently stain a tooling project.
- Store hats away from direct, prolonged sun, since UV exposure accelerates fading in a way that looks like damage rather than the gradual patina full-grain leather is supposed to build.
- Watch for cracking, stiffening, or lifted edges as the signal that a patch needs conditioning or, eventually, replacement.
With normal wear and seasonal conditioning, full-grain leather patches can remain presentable for five years or more, while faux leather typically holds its look for two to three years before showing uneven fading. That gap is the clearest argument for choosing full-grain when a hat needs to last.
History and cultural significance of leather patch hats
Leather patches on caps trace back to outdoor and workwear culture, where a stitched leather emblem on a canvas or wool cap signaled durability long before it signaled style. Trucking companies, farm equipment brands, and outdoor gear makers used leather patches decades ago because leather held up to weather and rough handling better than embroidered thread alone, and a debossed logo did not fade the way printed marks did.
The look crossed into mainstream fashion as outdoor and workwear aesthetics became a broader style statement rather than a functional necessity. What started as a rancher’s or logger’s cap became a staple for small breweries, coffee shops, and independent brands looking for a rugged, authentic identity without the cost of embroidery on every unit.
Part of the appeal has always been the sense of craft. A leather patch reads as more deliberate than a printed logo, partly because leather ages and shows use in a way that other materials do not. That aging process, once purely practical, is now often the point: a hat that looks a little worn feels earned rather than cheap. For small businesses and independent brands today, a leather patch hat borrows that same credibility, signaling permanence and care even on a modest first order.
Common customization options and trends in leather patch hats
Customization on a leather patch hat runs deeper than picking a hat color. The patch shape itself is a major decision, with round, shield, and rectangular patches remaining the most common because they fit cleanly on a structured front panel without excess trimming.
Color and finish trends have shifted toward subtlety. Rather than bright multi-color prints, many small brands now favor a single-tone deboss or a laser-engraved mark that leans into the leather’s natural color rather than covering it. Two-tone patches, where a laser or deboss creates contrast within the same piece of leather, have also grown more common as a way to add depth without introducing print.
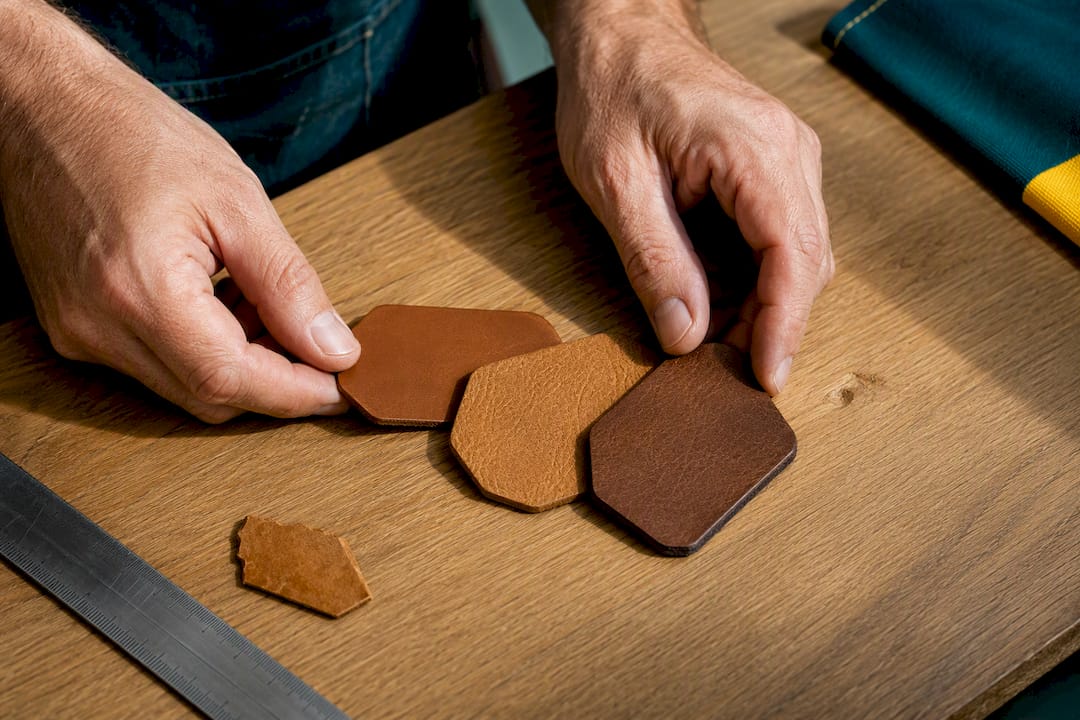
Beyond the patch itself, buyers are customizing the surrounding details: contrasting stitch colors around the patch’s border, mixed hat panel colors, and adjustable strap hardware in brushed metal or leather to match the patch tone. Combining a leather patch with an embroidered side or back detail is another common request, giving a hat a layered look without asking leather to do every job.
For businesses ordering in small batches, the most practical trend is restraint: a single bold mark, one decoration method, and a hat color that lets the leather stand out rather than compete with a busy front panel.
Cost factors influencing leather patch hat pricing
Several decisions stack up to determine what a leather patch hat actually costs. The leather itself is one factor, with full-grain typically running higher than faux due to material sourcing and the extra conditioning it can support over its life.
Decoration method changes cost meaningfully. A custom deboss die is a one-time tooling cost that pays off at higher quantities, while laser engraving and screen printing usually scale down more affordably for smaller runs since they skip the custom mold entirely. Attachment method adds another layer: hand stitching takes more labor time than a heat press, which shows up in the per-unit price.
Quantity remains the biggest lever. Tooling and setup costs get spread across more units at higher volumes, which is why small runs and one-offs carry a higher per-hat price than a bulk order. The hat itself, structured caps with buckram reinforcement, mesh-back truckers, or five-panels, also varies in base cost before the patch is even added.
Finally, artwork complexity plays a quiet role. A design that needs a screen-print color fill on top of a leather patch costs more to produce than a single-tone deboss, simply because it involves an extra production step.
Typical turnaround times for custom leather patch hat orders
Turnaround on a custom leather patch hat depends on where the order sits in the production sequence: sampling, mold or die creation, patch production, attachment, and final inspection. A design that only needs a laser file or a simple deboss mold generally moves faster than one requiring a custom multi-level die.
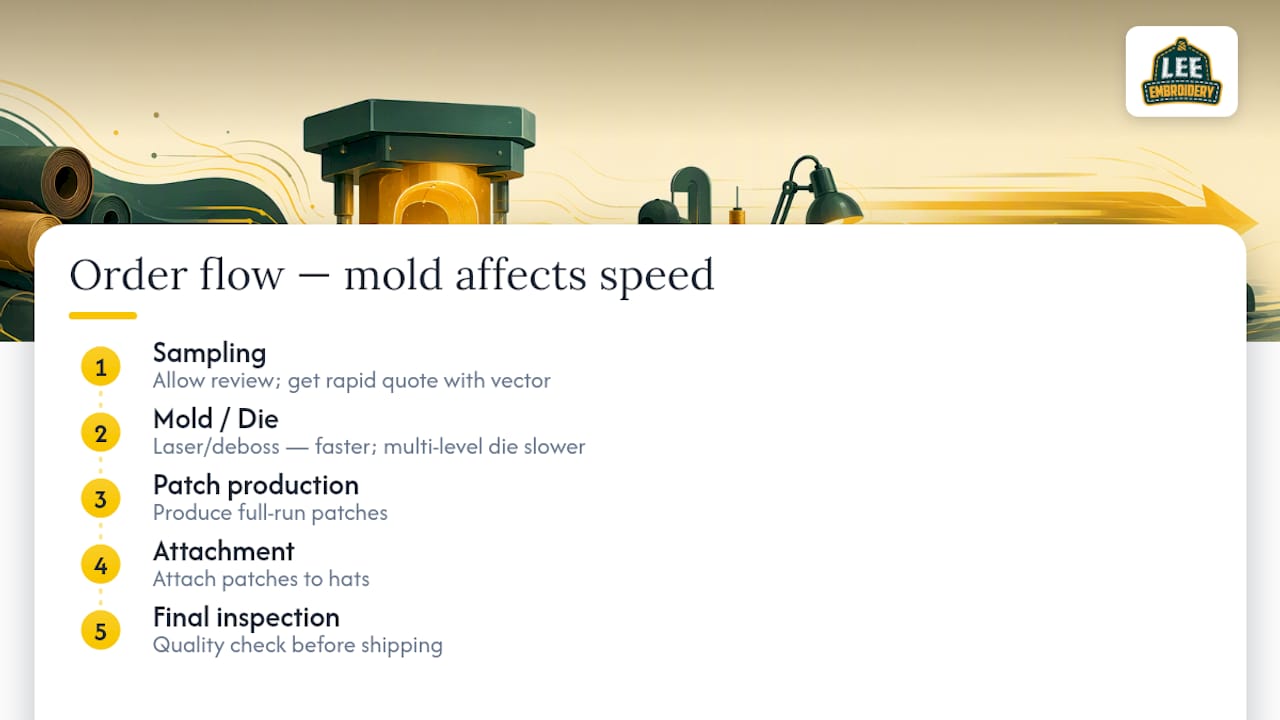
Sampling is often the step small businesses underestimate. A physical sample takes real production time to create correctly, and skipping it to save a few days usually costs more time later if the full run needs adjustment. Requesting a rapid quote up front, with vector artwork attached, helps a manufacturer flag sizing or color issues before the sample stage even begins.
For businesses planning a launch date, the safest approach is building in time for one round of sample review and adjustment before the full production run starts, rather than assuming the first sample will be the final approved version.
Lee Embroidery’s sample-first workflow and common customer choices
Some custom patch manufacturers offer complimentary samples and rapid quotes so you can verify material, decoration, and fit before committing to a full run. Many customers land exactly where this guide points: full-grain leather for a premium, aging look, and hand-stitched attachment for hats built for heavy use. Proofs paired with a physical sample are what keep rework off the table, catching sizing or color issues before production begins rather than after.
— Bilal
How Lee Embroidery can make your leather patch hats
You have the specs now: structured cap, the right leather, the right decoration, hand stitching for durability. Lee Embroidery turns that plan into a finished hat, with custom leather patches built from full-grain or faux leather, expert mockups before production, complimentary samples, and a quick quote turnaround so you are not waiting weeks just to see a price.

Getting started is straightforward:
- Request a complimentary sample so you can hold the actual leather, finish, and stitching before approving a full order.
- Upload your vector artwork and ask about minimum line weights for your specific design.
- Get a production timeline and price estimate based on your quantity, decoration method, and attachment choice.
Whether you need a handful of hats for a small team or a bulk order for retail, browse the full range of custom patches Lee Embroidery produces, from leather to woven and everything in between, and request your sample to see the craftsmanship firsthand.
Sources
- Richardson hats (hat construction guidance)
- Leather Patch Hats: Finishes, Styles, and When to Choose Them
- Structured Canvas Cap Manufacturer – StitchmanInc
- Leather patch hats (Etsy market guidance)
FAQ
What size leather patch should I use for my hat?
Most structured caps look best with a patch between roughly two and a half and three and a half inches wide, with the exact size depending on your logo’s detail and the hat’s front curvature. Flatter fronts like five-panels and snapbacks can carry slightly wider patches than a curved trucker front.
How do you attach leather patches to hats?
Leather patches are attached by hand stitching, heat press with an adhesive backing, or a combination of both, with hand stitching offering the most durability for heavy use. A sewn or merrowed border can add extra hold and cover any inconsistency in the leather’s cut edge.
How long do you press a leather patch on a hat?
Pressing time depends on the adhesive backing and press temperature specified by the patch and hat manufacturer, so there is no single universal setting. Heat press works well for gifts or indoor wear, but hand stitching remains the safer choice for hats facing heavy outdoor use or frequent washing.
What hats are best for patches?
Structured caps with reinforced front panels, including trucker caps, structured snapbacks, and five-panel hats, hold leather patches best because the stiffened front keeps the patch flat and readable. Softer, unstructured crowns can work too, but only with added reinforcement behind the panel.